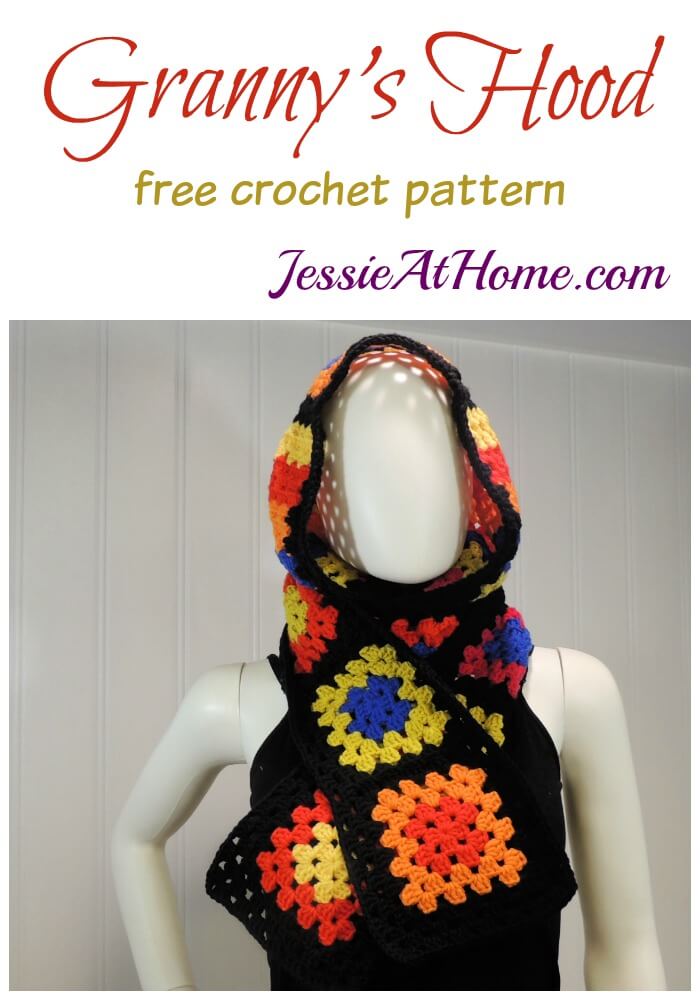
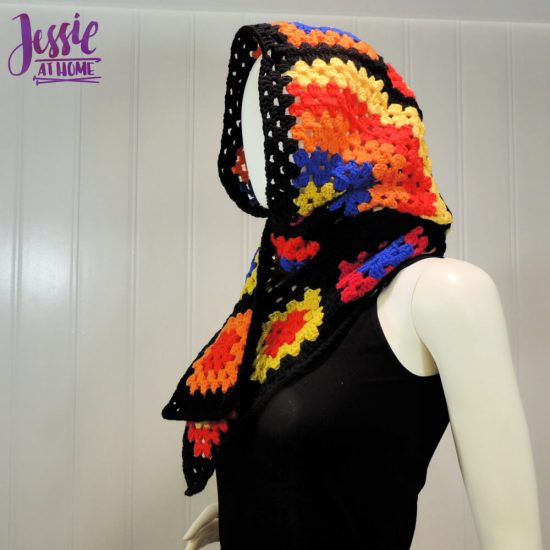
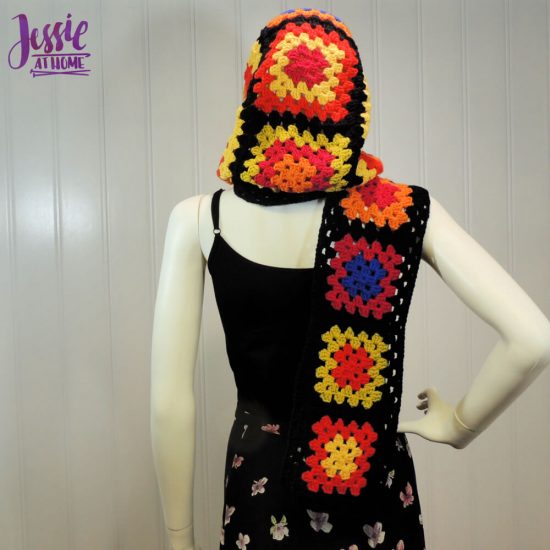
Granny’s Hood is actually a scoodie: a scarf with an attached hood. The scarf is made with granny squares, and the hood is made with sides of 1/4 circle grannies, and granny squares down the center. Bright, happy, rainbow colors of Sugar Bush Bold yarn are used making this piece full of joy. Due to the way the scoodie is constructed, it fits many sizes. The parts of the scoodie are joined using the join-as-you-go method, so there is no seaming. If you want the scarf to be longer or shorter, just add or subtract squares from the scarf section, it’s quite simple. Brighten up the white winter with Granny’s Hood!


Granny’s Hood
Crochet Pattern
Easy Skill Level
Designed by Jessie Rayot
Size:
One size fits most – pre-teen to adult.
Scarf section: 79″ x 6″
Yarn:
Sugar Bush Bold, 100% Wool, worsted weight, 100 g / 190 yds
Fleur De Rose 3014: Color A – 1 skein (55 g / 105 yds)
Tomato Fields 3010: Color B – 1 skein (60 g / 115 yds)
Copper Mine 3038: Color C – 1 skein (55 g / 105 yds)
Yukon Gold 3023: Color D – 1 skein (70 g / 135 yds)
Clover 3030: Color E – 1 skein (45 g / 85 yds)
Trinity Bay Blue 3033: Color F – 1 skein (40 g / 75 yds)
Rockies 3019: Color G – 2 skeins (200 g / 380 yds)
Sugar Bush Bold can be found at many Local Yarn Shops, including the one by me: Yarnia
Hook:
US-7, 4.5mm
Gauge:
4 Round Granny = 4” [10 cm]
Other supplies:
yarn needle
Stitches and Abbreviations:
ch – chain
dc – double crochet
sc – single crochet
sl st – slip stitch
sp(s) – space(s)
st(s) – stitch(es)
Getting Started:
Join As You Go (find a tutorial at https://jessieathome.com/stitchopedia-techniques-joinasyougo-for-joining-grannies/ – Start the last round of the square and work until you get to the first corner that needs to be joined. Make the first ch of the corner as normal, to make the second ch, first insert the hook from front to back into the corner ch that is being connecting to, then make the chain by yarning over, and pulling through everything on the needle.
Now complete the next 3 dc. Connect the next ch stitch, by first inserting the hook from front to back in the chain space that is being joined into, then make the chain in the same manner as before. Continue joining side in this manner until next corner is reached. Join first ch of next corner to finish off.
When joining squares, if the first side of the round is joined, the last chain of the starting ch-5 is joined to the first corner/space the square is being joined to.
Pattern:
Hood Side (make 2)
Row 1 (right side): With Color A, ch 5 (counts as first ch, first dc, and ch 1), (dc, ch 1, dc, ch 1, dc) in first ch made. – {4 dc}
Row 2 (wrong side): Turn, ch 3 (counts as first dc here and throughout), dc in first ch-1 sp, ch 1, 2 dc in next ch-1 sp, ch 1, dc in next ch-1 sp, dc in last st. – {6 dc}
Row 3: Turn, ch 4 (counts as first dc and ch 1), [3 dc in next ch-1 sp, ch 1] 2 times, dc in last st. – {8 dc}
Row 4: Turn, with Color E, ch 4, [3 dc in next ch-1 sp, ch 1] 3 times, dc in last st. – {11 dc}
Row 5: Turn, ch 3, 2 dc in next ch-1 sp, [ch 1, (2 dc, ch 1, 2 dc) in next ch-1 sp] 2 times, ch 1, 2 dc in next st, dc in last st. – {14 dc}
Row 6: Turn, ch 4, [3 dc in next ch-1 sp, ch 1] 5 times, dc in last st. – {17 dc}
Row 7: Turn, with Color F, ch 3, 3 dc in next ch-1 sp, [ch 1, 4 dc in next ch-1 sp] 4 times, ch 1, 3 dc in next ch-1 sp, dc in last st. – {24 dc}
Row 8: Turn, ch 4, [(2dc, ch 1, 2 dc) in next ch-1 sp, ch 1] 5 times, dc in last st. – {22 sts}
Row 9: Turn, ch 3, [2 dc in next ch-1 sp, ch 1, 3 dc in next ch-1 sp, ch 1] 5 times, 2 dc in next ch-1 sp, dc in last st. – {29 sts}
Row 10: Turn, with Color C, ch 4, [3 dc in next ch-1 sp, ch 1] 10 times, dc in last st. – {32 dc}
Row 11: Turn, ch 3, 2 dc in next ch-1 sp, ch 1, 3 dc in next ch-1 sp, ch 1, (2 dc, ch 1, 2 dc) in next ch-1 sp, ch 1, *[3 dc in next ch-1 sp, ch 1] 2 times, (2 dc, ch 1, 2 dc) in next ch-1 sp, ch 1; repeat from * 1 more time, 3 dc in next ch-1 sp, ch 1, 2 dc in next ch-1 sp, dc in last st. – {36 dc}
Row 12: Turn, ch 4, [3 dc in next ch-1 sp, ch 1] 13 times, dc in last st. – {41 dc}
Row 13: Turn, with Color B, ch 3, 2 dc in next ch-1 sp, ch 1, [3 dc in next ch-1 sp, ch 1] 12 times, 2 dc in next ch-1 sp, dc in last st. – {42 dc}
Row 14: Turn, ch 4, 3 dc in next ch-1 sp, ch 1, *[3 dc in next ch-1 sp, ch 1] 2 times, (2 dc, ch 1, 2 dc) in next ch-1 sp, ch 1; repeat from * 2 more times, [3 dc in next ch-1 sp, ch 1] 3 times, dc in last st. – {44 dc}
Row 15: Turn, ch 3, 2 dc in next ch-1 sp, ch 1, [3 dc in next ch-1 sp, ch 1] 15 times, 2 dc in next ch-1 sp, dc in last st. – {51 dc}
Row 16: Turn, with Color D, ch 4, 3 dc in next ch-1 sp, ch 1, *[3 dc in next ch-1 sp, ch 1] 4 times, (2 dc, ch 1, 2 dc) in next ch-1 sp, ch 1; repeat from * 1 more time, [3 dc in next ch-1 sp, ch 1] 5 times, dc in last st. – {52 dc}
Row 17: Turn, ch 3, 2 dc in next ch-1 sp, ch 1, [3 dc in next ch-1 sp, ch 1] 17 times, 2 dc in next ch-1 sp, dc in last st. – {57 dc}
Row 18: Turn, ch 4, [3 dc in next ch-1 sp, ch 1] 5 times, (2 dc, ch 1, 2 dc) in next ch-1 sp, [3 dc in next ch-1 sp, ch 1] 6 times, (2 dc, ch 1, 2 dc) in next ch-1 sp, ch 1, [3 dc in next ch-1 sp, ch 1] 5 times, dc in last st. – {58 dc}
Border – continue from Row 18
Rnd 1: Turn, ch 3, 2 dc in next ch-1 sp, ch 1, [3 dc in next ch-1 sp, ch 1] 19 times, 3 dc in next ch-1 sp, ch 2, [3 dc around side of next st, ch 1, skip next st] 7 times, [3 dc around side of next st, ch 1] 2 times, ch 1, skip next st, 3 dc around side of next st, ch 2, 3 dc around side of next st, ch 1, skip next st, 3 dc around side of next st, ch 1, [3 dc around side of next st, ch 1, skip next st] 7 times, 3 dc around side of next st, ch 2, sl st to top of beginning ch 3. – {41 sets of 3 dc}
Hood Center:
Make 3 six round squares in the following colors: (C, A, E), (A, D, B) & (D, F, C).
Make a seventh round in Color G on the first square. Join the first side of this round to the curved side of one Hood Side, starting at the corner, join the third side of this round to the curved side of the other hood side ending at the corner.
Make a seventh round in Color G on the second square. Join the first, second, and third sides of this round to the center of the curved section of one Hood side, the top of the first square, and the center of the other curved section, so that the second square sits directly on top of the first.
Make a seventh round in Color G on the third square. Join the first, second, and third sides of this round to the top of the curved section of one Hood side, the top of the second square, and the top of the other curved section, so that the third square sits directly on top of the second.
Weave in all ends.
Hood Border: Join Color G to one ch-2 corner, ch 3 (counts as first dc), 2 dc in same ch-2 sp, ch 1, 3 dc in next ch-1 sp, ch 1, 2 dc in each of next 2 ch-1 sps, ch 1, [3 dc in next ch-1 sp, ch 1] 2 times, 2 dc in each of next 2 ch-1 sps, ch 1, [3 dc in next ch-1 sp, ch 1] 2 times, 2 dc in each of next 2 ch-2 sps, ch 1, [3 dc in next ch-1 sp, ch 1] 2 times, 2 dc in each of next 2 ch-1 sps, ch 1, [3 dc in next ch-1 sp, ch 1] 2 times, 2 dc in each of next 2 ch-2 sps, ch 1, [3 dc in next ch-1 sp, ch 1] 2 times, 2 dc in each of next 2 ch-1 sps, ch 1, [3 dc in next ch-1 sp, ch 1] 2 times, 2 dc in each of next 2 ch-1 sps, ch 1, 3 dc in next ch-1 sp, ch 1, (3 dc, ch 2, 3 dc) in next ch-2 sp, ch 1, [3 dc in next ch-1 sp, ch 1] 9 times, 2 dc in each of next 2 ch-2 sps, ch 2, [3 dc in next ch-1 sp, ch 1] 6 times, 2 dc in each of next 2 ch-2 sps, ch 1, [3 dc in next ch-1 sp, ch 1] 9 times, 3 dc in next ch-2 corner, ch 2, sl st to top of beginning ch-3. – {23 sets of 3 or 4 dc along bottom of hood, 28 sets of 3 or 4 dc along front of hood}
Scarf
Make 15 four round squares in the following colors: (B, C), (E, F), (E, B), (D, A), (C, D), (A, F), (E, C), (B, D), (C, E), (F, B), (E, F), (A, C), (F, A), (B, E) & (B, D).
Add Rnd 5 to each square with Color G, joining each square to the previous one when making the 2nd side of the round.
Fasten off and weave in ends.
Squares (make as called for in pattern)
Rnd 1: With first Color, ch 4, sl st to first ch made to form a loop, ch 5 (counts as first dc and ch 2 here and throughout), [3 dc, ch 2] 3 times in loop, 2 dc in ring, sl st to top of 3rd ch of beginning ch-5, sl st into ch-2 sp. – {3 dc on each side}
Rnd 2: Ch 5, 3 dc in same ch-2 sp, *ch 1, (3 dc, ch 2, 3 dc) in ch-2 sp; repeat from * 2 more times, ch 1, 2 dc in ch-2 sp, sl st to top of 3rd ch of beginning ch-5. – {2 sets of 3 dc on each side}
Rnd 3: With second Color, ch 5, 3 dc in same ch-2 sp, *ch 1, 3 dc in next ch-1 sp, ch 1, (3 dc, ch 2, 3 dc) in ch-2 sp; repeat from * 2 more times, ch 1, 3 dc in next ch-1 sp, ch 1, 2 dc in ch-2 sp, sl st to top of 3rd ch of beginning ch-5. – {3 sets of 3 dc on each side}
Rnd 4: Ch 5, 3 dc in same ch-2 sp, *ch 1, [3 dc in next ch-1 sp, ch 1] 2 times, (3 dc, ch 2, 3 dc) in ch-2 sp; repeat from * 2 more times, ch 1, [3 dc in next ch-1 sp, ch 1] 2 times, 2 dc in ch-2 sp, sl st to top of 3rd ch of beginning ch-5. – {4 sets of 3 dc on each side}
Rnd 5: With third Color, ch 5, 3 dc in same ch-2 sp, *ch 1, [3 dc in next ch-1 sp, ch 1] 3 times, (3 dc, ch 2, 3 dc) in ch-2 sp; repeat from * 2 more times, ch 1, [3 dc in next ch-1 sp, ch 1] 3 times, 2 dc in ch-2 sp, sl st to top of 3rd ch of beginning ch-5. – {5 sets of 3 dc on each side}
Rnd 6: Ch 5, 3 dc in same ch-2 sp, *ch 1, [3 dc in next ch-1 sp, ch 1] 4 times, (3 dc, ch 2, 3 dc) in ch-2 sp; repeat from * 2 more times, ch 1, [3 dc in next ch-1 sp, ch 1] 4 times, 2 dc in ch-2 sp, sl st to top of 3rd ch of beginning ch-5. – {6 sets of 3 dc on each side}
Rnd 7: With Color G, ch 5, 3 dc in same ch-2 sp, *ch 1, [3 dc in next ch-1 sp, ch 1] 5 times, (3 dc, ch 2, 3 dc) in ch-2 sp; repeat from * 2 more times, ch 1, [3 dc in next ch-1 sp, ch 1] 5 times, 2 dc in ch-2 sp, sl st to top of 3rd ch of beginning ch-5. – {7 sets of 3 dc on each side}
Border
Rnd 1 (right side): Hold scarf with a short side across the top and join Color G to the top right ch-2 corner, ch 5, 3 dc in same ch-2 corner, ch 1, [3 dc in next ch-1 sp, ch 1] 4 times, (3 dc, ch 2, 3 dc) in ch-2 sp, ch 1, *[3 dc in next ch-1 sp, ch 1] 4 times, 2 dc in each of next 2 ch-2 sps, ch 1; repeat from * 13 more times, [3 dc in next ch-1 sp, ch 1] 4 times, (3 dc, ch 2, 3 dc) in ch-2 sp, ch 1, [3 dc in next ch-1 sp, ch 1] 4 times, (3 dc, ch 2, 3 dc) in ch-2 sp, ch 1, *[3 dc in next ch-1 sp, ch 1] 4 times, 2 dc in each of next 2 ch-2 sps, ch 1; repeat from * 4 more times, 3 dc in next ch-1 sp, begin joining to Hood Bottom, starting with the corner, ch 1, [3 dc in next ch-1 sp, ch 1] 3 times, [3 dc in next ch-1 sp, ch 1] 4 times, 2 dc in each of next 2 ch-2 sps, ch 1, 3 dc in next ch-1 sp, ch 1, 3 dc in next ch-1 sp, ch 2 (join the first of these 2 chs as normal and then join the second to the next ch-1 sp on Hood Bottom), [3 dc in the next ch-1 sp, ch 1] 2 times, 2 dc in each of next 2 ch-2 sps, ch 1, [3 dc in next ch-1 sp, ch 1] 4 times, 2 dc in each of next 2 ch-2 sps, ch 1, [3 dc in next ch-1 sp, ch 1] 3 times, complete connecting to Hood Bottom, **2 dc in each of next 2 ch-2 sps, ch 1, [3 dc in next ch-1 sp, ch 1] 4 times; repeat from ** 4 more times, 2 dc in next ch-2 sp, sl st to 3rd ch of beginning ch-5.
Rnd 2: Sl st into ch-2 sp, ch 5, 3 dc in same ch-2 sp, ch 1, *(3 dc in next ch-1 sp, ch 1) across to next ch-2 sp, (3 dc, ch 2, 3 dc) in ch-2 sp, ch 1; repeat from * 2 more times, [3 dc in next ch-1 sp, ch 1] 25 times, dc in next ch-1 sp, dc in sp where Scarf and Hood join, dc in next ch-1 sp on Hood, ch 1, [3 dc in next ch-1 sp, ch 1] 25 times, dc in next ch-1 sp, dc in sp where Hood and Scarf join, dc in next ch-1 sp on Scarf, ch 1, [3 dc in next ch-1 sp, ch 1] 25 times, 2 dc in next ch-2 sp, sl st to 3rd ch of beginning ch-5.
Fasten off and weave in ends.
Wear or give and enjoy!

If you enjoy what you have found here at JessieAtHome, please like my Facebook page to get all the updates on new tutorials, other posts, sales, and coming events.
If you have any questions or concerns, want to share pictures of your work, or just want to chat with Jessie and other crafty individuals, than join my Facebook group.
If you enjoy this free crochet pattern, please consider buying some of your supplies from one of these affiliate links. Thank you.

©Copyright 2019 Jessie Rayot / Jessie At Home All my videos, patterns, charts, photos and posts are my own work. Do not copy them in any way. If you want to share this information with someone, share the link to this post. If you want to share on your own blog / website, then you may use the first photo in this post and link back to this post. You may not give away printed copies of this post. Thank you.
If you liked this pattern, take a look at these!


Ive gone through the pattern 3 times and no where does it specify how many granny squares to make. It just says to make as many as specified in the pattern. The pictures make show a short scarf, yet the definition says its over 70″ long. Could you tell me how many granny squares to make to get the correct length? Thank you!
It’s written in the pattern under “scarf”. It tells you how many and what colors to use. I just moved the pattern for the squares down to just below that section in the hopes that it will be clearer.
I want to make a long granny square coat with a hood, scarf, pockets, and a belt.
How many Granny Squares would I need to make for the hood.
Everything will be attached.
This will be for a long XL
Just figure out the length you need and then divide it by the size of the squares to see how many squares you need for the scarf section.