This fun hat came about when I needed Christmas presents for some young cousins of mine. I had been making some Tunisian crochet squares and was thinking about how cool it would look if I changed colors between each pass. I am not a fan of having lots of ends to work into my pieces, so the tied ends seemed the perfect solution. Thus these quirky little hats were born! This pattern is written so that someone who has not tried Tunisian crochet before can still make this hat. There are many process photos to help along the way.

Moe
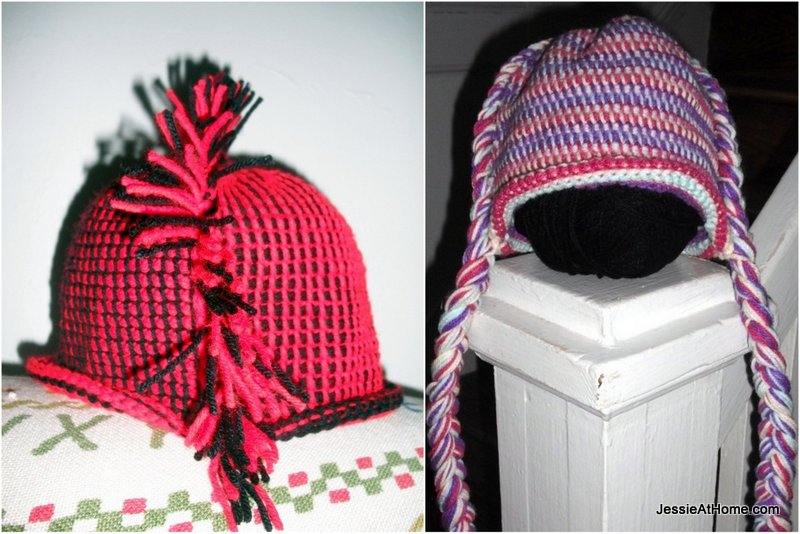
a Mohawk or braid hat
Tunisian Crochet Pattern
Beginner Skill Level
Designed by Jessie Rayot
Sizes:
Toddler (Child, Adult, Adult XL)
16 (19, 22, 25) inches
Yarn:
Worsted Weight (Red Heart Super Saver used in samples, but any worsted weight works as long as the gauge is correct.)
Hook/Needle:
5.5mm (US I/9) or size needed to obtain gauge
Gauge:
16 sts and 14 rows in a 4” square, done in Tunisian Simple Stitch
Other Notions:
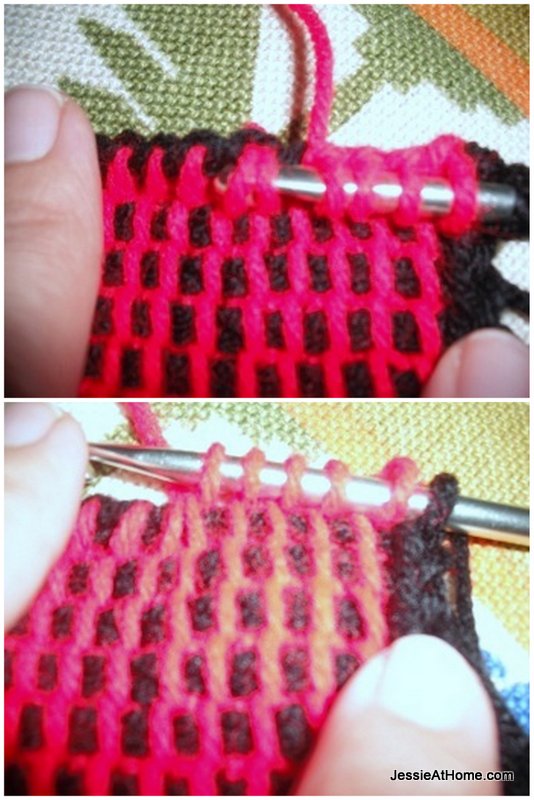
Yarn needle for weaving in ends
Stitches and Skills used:
CH ~ chain
YO ~ yarn over
MC ~ main color
CC ~ complimentary color
Hat Body
For Mohawk hat, start and end each part of each row with a 6” tail, for braid hat use a 36” (or longer) tail. It may take a few rows to get used to just starting leaving a tail, but it will get easier as you go!
Ch 32 (38, 44, 50) with MC, cut yarn leaving tail
Row 1: (Part 1) With CC, insert hook in bottom loop of 2nd ch from hook, YO, pull up loop; (insert hook in next bottom loop of ch, YO, pull up loop) across to end of ch leaving all loops on the hook (32 (38, 44, 50) loops), cut yarn leaving a tail
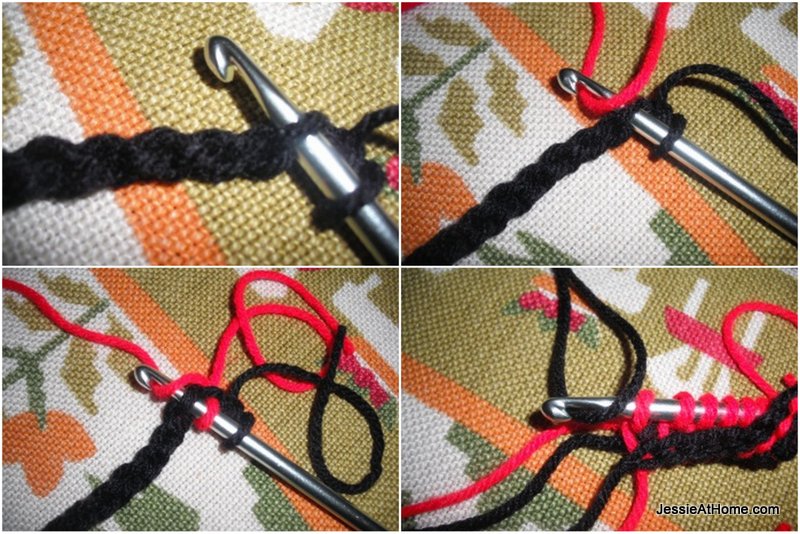
Row 1: (Part 2) With MC, YO, pull through 1st loop on hook; (YO, pull through 2 loops on hook) across until one loop remains on the hook, cut yarn leaving a tail

Row 2: (Part 1) With CC, skip first vertical bar, (insert hook under next vertical bar, YO, pull up a loop) across to end leaving all loops on hook, cut yarn leaving a tail
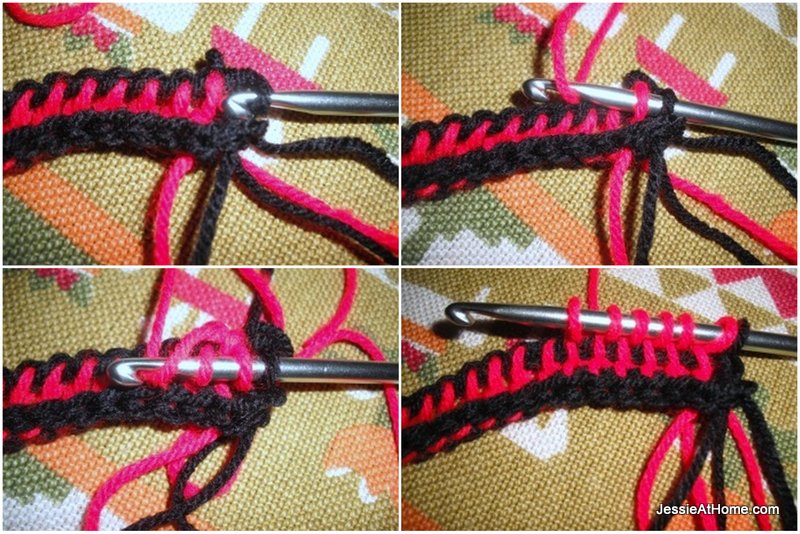
Row 2: (Part 2) With MC, YO, pull through 1st loop on hook; (YO, pull through 2 loops on hook) across until one loop remains on the hook, cut yarn leaving a tail
Repeat Row 2: until piece measures 5 (6, 7, 8)” long
Shaping Top
Row 1: (Part 1) With CC, skip first vertical bar, (insert hook under next vertical bar, YO, pull up a loop) across to end leaving all loops on hook, cut yarn leaving a tail (32 (38, 44, 50) loops)
Row 1: (Part 2) With MC, YO, pull through 1st loop on hook; * YO, pull through 3 loops on hook (YO, pull through 2 loops on hook) 4 times, rep from * 4 (5, 6, 7) more times, YO, pull through 2 loops on hook, one loop remains on the hook, cut yarn leaving a tail
Row 2: (Part 1) With CC, skip first vertical bar, * (insert hook under next vertical bar, YO, pull up a loop) 4 times, insert hook under next 2 vertical bars, YO, pull up a loop, rep from * 4 (5, 6, 7) more times, insert hook under last vertical bar, YO, pull up a loop cut yarn leaving tail (27 (32, 37, 42) loops)
Row 2: (Part 2) With MC, YO, pull through 1st loop on hook; * YO, pull through 3 loops on hook (YO, pull through 2 loops on hook) 3 times, rep from * 4 (5, 6, 7) more times, YO, pull through 2 loops on hook, one loop remains on the hook, cut yarn leaving tail
Row 3: (Part 1) With CC, skip first vertical bar, * (insert hook under next vertical bar, YO, pull up a loop) 3 times, insert hook under next 2 vertical bars, YO, pull up a loop, rep from * 4 (5, 6, 7) more times, insert hook under last vertical bar, YO, pull up a loop cut yarn leaving tail (22 (26, 30, 34) loops)
Row 3:(Part 2) With MC, YO, pull through 1st loop on hook; * YO, pull through 3 loops on hook (YO, pull through 2 loops on hook) 2 times, rep from * 4 (5, 6, 7) more times, YO, pull through 2 loops on hook, one loop remains on the hook, cut yarn leaving tail
Row 4: (Part 1) With CC, skip first vertical bar, * (insert hook under next vertical bar, YO, pull up a loop) 2 times, insert hook under next 2 vertical bars, YO, pull up a loop, rep from * 4 (5, 6, 7) more times, insert hook under last vertical bar, YO, pull up a loop cut yarn leaving tail (17 (20, 23, 26) loops)
Row 4: (Part 2) With MC, YO, pull through 1st loop on hook; * YO, pull through 3 loops on hook, YO, pull through 2 loops on hook, rep from * 4 (5, 6, 7) more times, YO, pull through 2 loops on hook, one loop remains on the hook, cut yarn leaving tail
Row 5: (Part 1) With CC, skip first vertical bar, * insert hook under next vertical bar, YO, pull up a loop, insert hook under next 2 vertical bars, YO, pull up a loop, rep from * 4 (5, 6, 7) more times, insert hook under last vertical bar, YO, pull up a loop cut yarn leaving tail (12 (14, 16, 18) loops)
Row 5: (Part 2) With MC, YO, pull through 1st loop on hook; * YO, pull through 3 loops on hook, rep from * 4 (5, 6, 7) more times, YO, pull through 2 loops on hook, one loop remains on the hook, cut yarn leaving tail
Row 6: (Part 1) With CC, skip first vertical bar, * insert hook under next 2 vertical bars, YO, pull up a loop, rep from * 4 (5, 6, 7) more times, insert hook under last vertical bar, YO, pull up a loop cut yarn leaving tail (7 (8, 9, 10) loops)
Row 6: (Part 2) With MC, YO, pull through 1st loop on hook; * YO, pull through 3 loops on hook, rep from * 2 (2, 3, 3) more times, YO, pull through any remaining loops on hook, one loop remains on the hook, cut yarn leaving tail
Row 7: (Part 1) With CC, skip first vertical bar, * insert hook under next 2 vertical bars, YO, pull up a loop, YO, pull through both loops on hook, rep from * across to end, fasten off and cut yarn leaving tail
Connecting Halves
Line up both halves of hat to make a whole hat. Tie ends together, 1 or 2 from each half in an overhand knot. Cut extra pieces of yarn to tie together opening at top of hat. Make sure knots are on outside of hat.
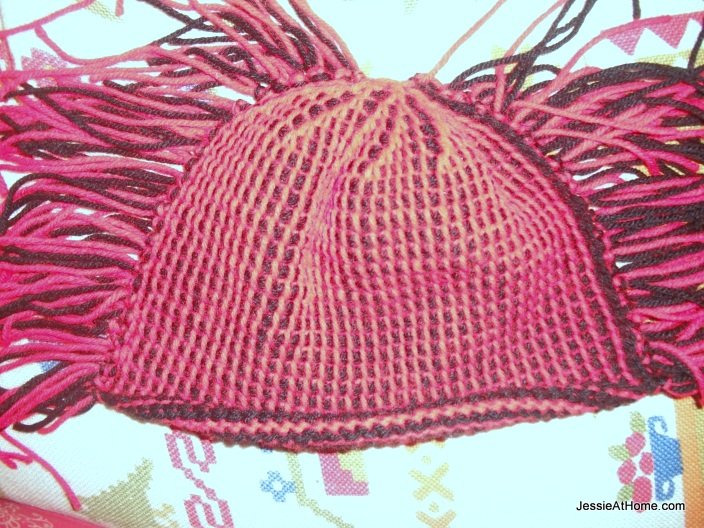

Clip ends to desired length.
Make braided hat in the same manner as the Mohawk hat, only using each color for part 2 of one row, and part one of the next. This leaves tails on the left side only of each half. To connect rows, thread one end of each color through the end loop of opposite half, then tie together. Start braids at the top of hat, working in ends along the way (as in a French braid.) Keep braiding until desired length is reached. Tie off and clip ends.

Braid hat using 4 colors.
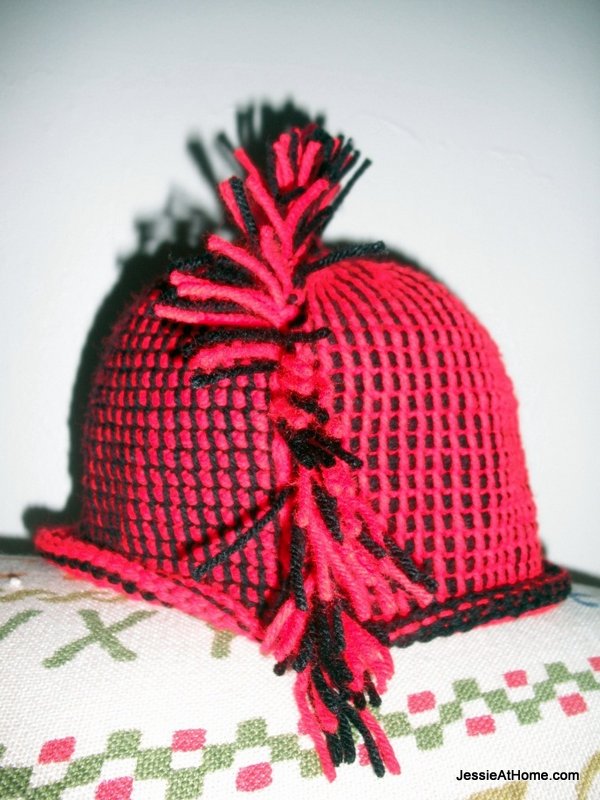
Mohawk hat made by switching MC and CC from one half to the other.
Did you enjoy what you found here at Jessie At Home? Then sign up for my newsletter and like my Facebook page, so you’ll get all the updates on new tutorials, other posts, sales, and coming events.
If you have any questions, want to share pictures of your work, or just want to chat with Jessie and other crafty individuals, than join one of our free Zoom Sit & Stitches. Find them on our Events Calendar.

© Copyright 2013 Jessie Rayot / Jessie At Home®, LLC All my videos, patterns, charts, photos and posts are my own work, so you may not copy them in any way. If you want to share this information with someone, then share the link to this post.


