Traditionally the Corner to Corner (C2C) Box Stitch is made with double crochet, but it can also be made with half double crochet to make the squares smaller. C2C has become a hot stitch over the past few years. It can be used to make a square or rectangle of any size with pretty much any yarn. Plus it is made of blocks so it can be used to create graphed images, and if made with half double crochet the boxes are a little smaller so a graph with more squares can be used. Once you have this stitch down you can take a graphed image (such as a cross stitch pattern) and crochet it. So cool!!

The yarns used in this tutorial were provided by Red Heart and Premier. All opinions are my own.
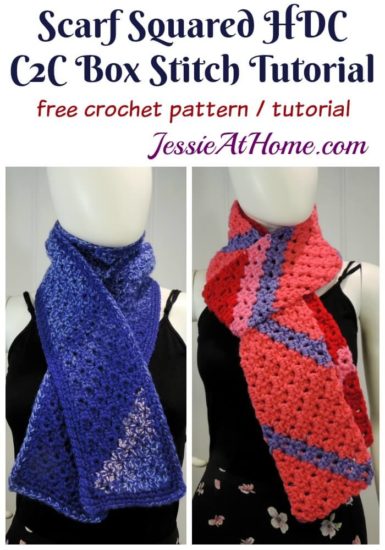
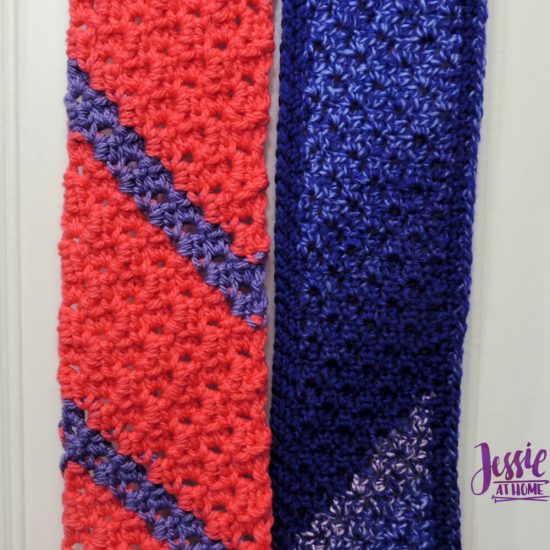
In this pattern, I will teach you the basics of how to make a Half Double Crochet C2C Box Stitch rectangle of any size you wish. I have made 2 sample scarves as well and will let you know the details of those. In addition, I will teach you how to add a linen stitch (or moss stitch) border on the HDC C2C.
If you would like to learn the Double Crochet C2C Box Stitch, then CLICK HERE.
Scarf Squared – HDC C2C Box Stitch Tutorial
Crochet Pattern
Easy Skill Level
Designed by Jessie Rayot
Size:
varies by yarn
Yarn:
any – the following were used for the samples in this pattern:
Red Heart With Love Chunky (size 5), 100% Acrylic, (141 g / 171 yds)
US L/11, 8.0 mm hook
7 blocks x 90 blocks = 5.5″ x 92″; (230 g / 280 yds) used
Premier Yarns Candy Shop, 100% Acrylic, worsted weight (size 4), 140 g / 260 yds
US-I/9, 5.5 mm
7 blocks x 99 blocks and 3 rnds linen st border = 4.75″ x 55″; most of 1 skein used
Hook:
varies by yarn
Gauge:
varies by yarn
Other supplies:
yarn needle
Stitches and Abbreviations: click on highlighted sts for tutorials
ch – chain
hdc – half double crochet
sl st – slip stitch
sp(s) – space(s)
st(s) – stitch(es)
Getting Started:
Choose a yarn and hook that you want and just give it a go. Details about the samples are listed under “Yarn” above.
Pattern:
Each C2C creation is made in 2 or 3 sections from the corner out. First is the Double Increase section which causes both sides adjacent to the corner (Sides A & B) to grow longer, next is the Decrease/Increase section (omit this section for a square) which causes one side (Side A) to stay the same length and just get taller (creating Side C), and the other side (Side B) to continue growing longer, and last is the Double Decrease section which brings both sides together by continuing to bring one side (Side C) up, and stopping growth on the other side (Side C) and bringing it over (creating Side D) to make the opposite corner from the starting corner.
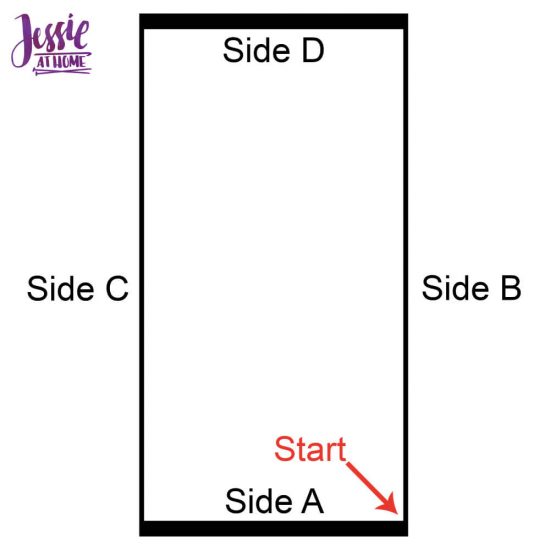
Double Increase
Row 1: Ch 4, hdc in 3rd and 4th chs from hook.
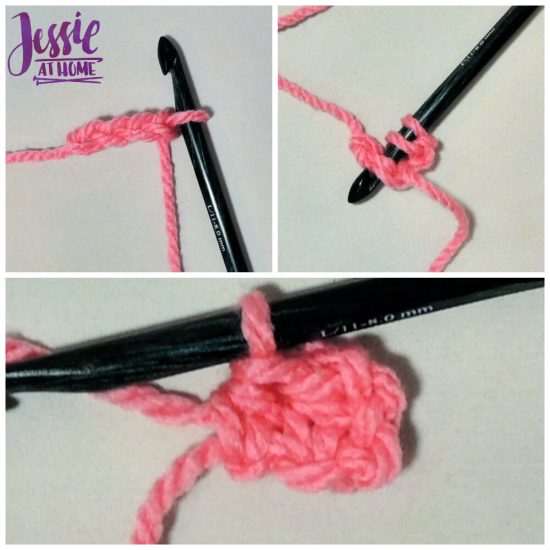
Row 2: Turn, ch 4, hdc in 3rd and 4th chs from hook, sl st into ch-2 sp of connecting square…
ch 2, 2 hdc in same ch-2 sp.
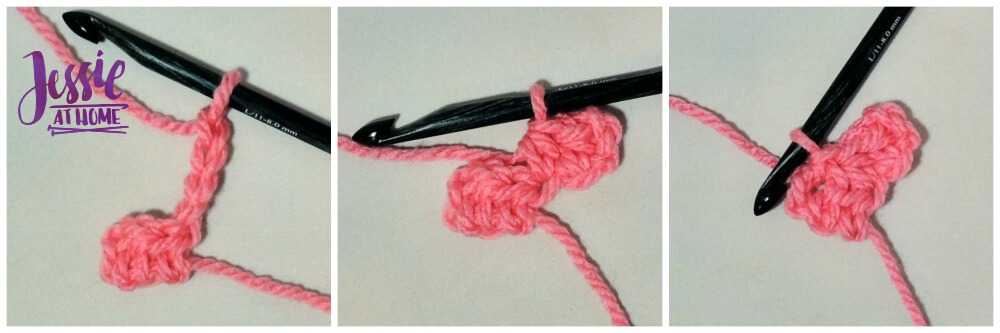
Row 3: Turn, ch 4, hdc in 3rd and 4th chs from hook, sl st into ch-2 sp of connecting square…
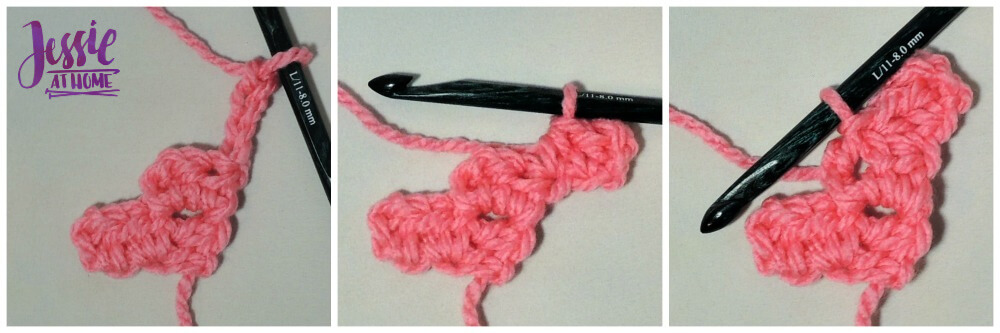
ch 2, 2 hdc in same ch-2 sp, sl st into ch-2 of next connecting square, ch 2, 2 hdc in same ch-2 sp.

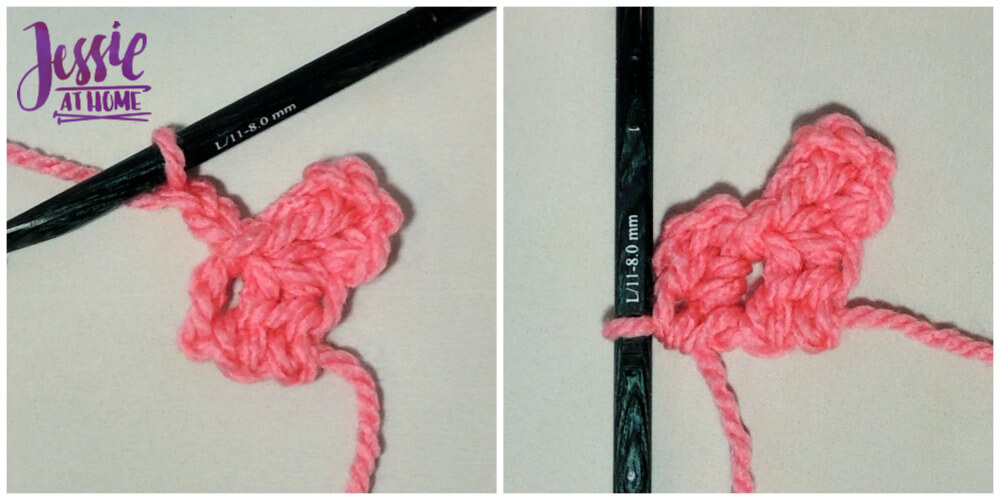
Row 4: Turn, ch 4, hdc in 3rd and 4th chs from hook, [sl st into ch-2 sp of connecting square, ch 2, 2 hdc in same ch-2 sp] until no ch-2 sps remain.
Repeat Row 4 until piece is desired length of shorter side of rectangle, move on to Decrease/Increase section. If making a square, skip Decrease/Increase section and move on to Double Decrease section.
Deacrease/Increase
Row 1: Turn, sl st in each of 2 hdc, sl st into ch-2 sp, *ch 2, 2 dc in same ch-2 sp, sl st into ch-2 of next connecting square; repeat from * until one ch-2 sp remains, ch 2, 2 hdc in same ch-2 sp. (this row has a decrease at the start and an increase at the end)
Row 2: Turn, ch 4, dc in 3rd and 4th chs from hook, sl st into ch-2 sp of connecting square, *ch 2, 2 dc in same ch-2 sp, sl st into ch-2 of next connecting square; repeat from * until one ch-2 sp remains. (this row has an increase at the start and a decrease at the end)
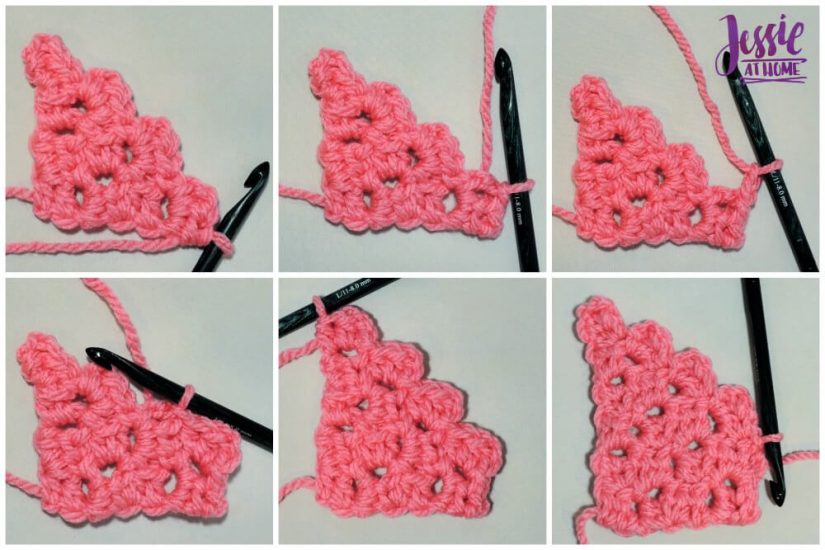
Repeat Rows 1 and 2 until piece measures desired length of long side. Move on to Double Decrease section.
Double Decrease
Row 1: Turn, sl st in each of 2 hdc, sl st into ch-2 sp, *ch 2, 2 hdc in same ch-2 sp, sl st into ch-2 of next connecting square; repeat from * until one ch-2 sp remains.

Repeat Row 1 until complete – last row will only have one square.
Fasten off and weave in all ends.
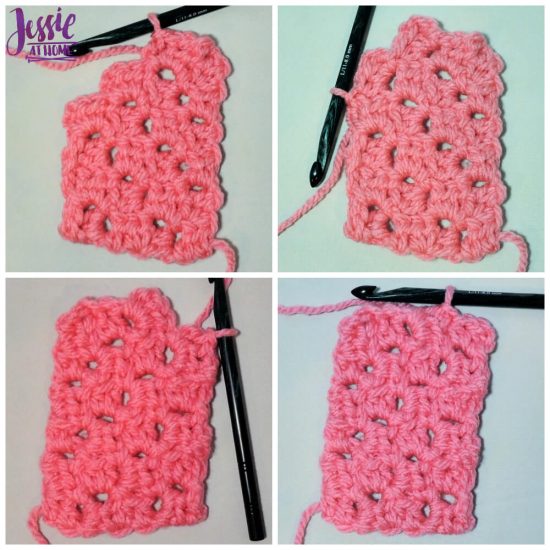
Optional Linen Stitch Border
Rnd 1: Attach yarn to any corner, *(sc, ch 2, sc) in corner, ch 1, (sc, ch 1) in edge of each square along side to next corner; repeat from * 3 more times, sl st to first sc made, sl st into ch-2 corner.
Rnd 2: Ch 1, *(sc, ch 2, sc) in ch-2 corner, ch 1, (sc, ch 1) in edge ch-1 to corner; repeat from * 3 more times, sl st to first sc made, sl st into ch-2 corner.
Repeat Rnd 2 as many times as desired.
All done! Now go out there and tackle some graphs!


If you enjoy what you have found here at JessieAtHome, please like my Facebook page to get all the updates on new tutorials, other posts, sales, and coming events.
If you have any questions or concerns, want to share pictures of your work, or just want to chat with Jessie and other crafty individuals, than join my Facebook group.
If you enjoy this free crochet pattern, please consider buying some of your supplies from one of these affiliate links. Thank you.

©Copyright 2019 Jessie Rayot / Jessie At Home All my videos, patterns, charts, photos and posts are my own work. Do not copy them in any way. If you want to share this information with someone, share the link to this post. If you want to share on your own blog / website, then you may use the first photo in this post and link back to this post. You may not give away printed copies of this post. Thank you.