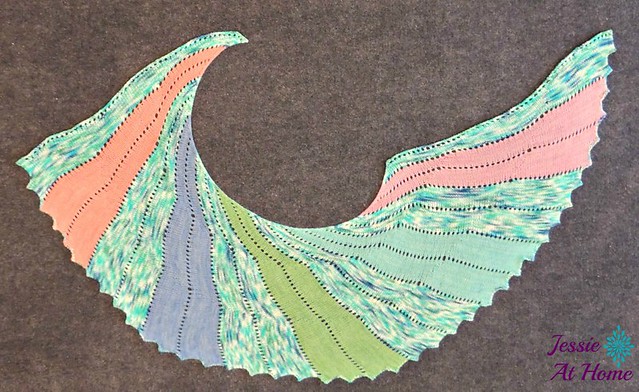
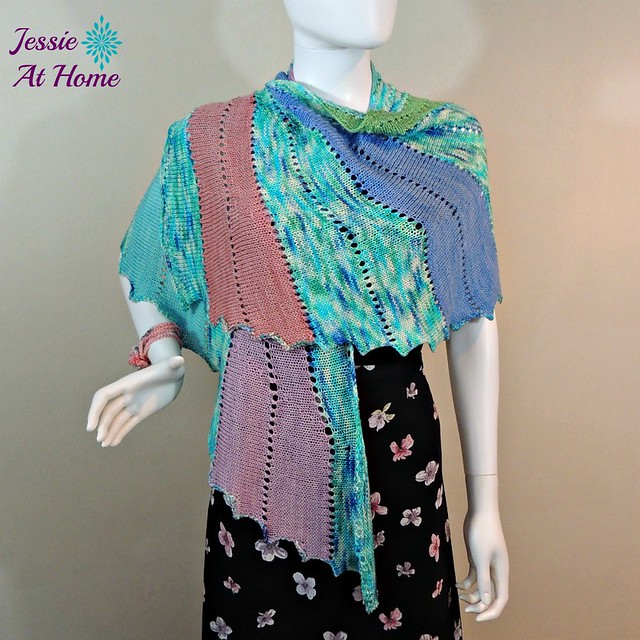
I’ve had many requests for a knit version of Skylark in Wonderland, so here it is! This flowing wrap uses Frabjous Fibers Mad Hatter (DK weight) yarn, which comes in many colors for you to personalize your own! It also features short rows for the shaping. When laid out flat, it really does resemble a bird wing.
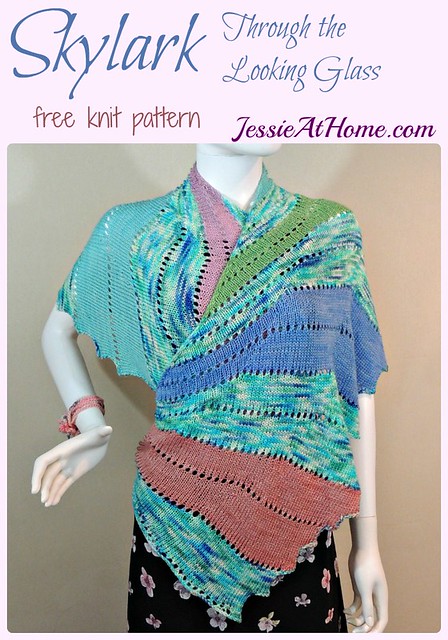

Skylark Through the Looking Glass
Knit Pattern
Intermediate Skill Level
Designed by Jessie Rayot
Size:
42″ x 17″
Yarn:
Frabjous Fibers / Wonderland Yarns Mad Hatter (DK weight)
1 mini skein pack: In a Nutshell: Lights, #54 – 430 yd/5 oz total
1 full size skein: Uncommon Nonsense: Wise Fish, #109 – 344 yd/4 oz
Needles:
US 7/4.5mm
Gauge:
18 sts x 30 rows in stockinette st
Stitches and Skills used:
k – knit
k2tog – knit 2 together
p – purl
pm – place marker
yo – yarn over
st(s) – stitch(es)
Getting Started:
This pattern includes short rows, so sometimes you will end a row with sts still remaining on the right hand needle. For help with short rows, watch this awesome free class from Craftsy.
When working with colors B-F: work last st of even rows and first st of odd rows with the color indicated (B-F) AND color A, treating them as one yarn. This will carry color A to the next point it is needed, leaving less ends to weave in, and creating a little color interest at the bottom of the wrap.
This pattern uses almost all of the full size (4 oz) skein, but has a good bit left over from each of the mini-skeins.

Pattern:
Row 1: With color A, co 108, k36, place marker, k34, pm k to end. {108 sts}
Row 2: P to end. – {108 sts}
Row 3: K4, (k2tog, yo) until 4 sts remain, k2tog, k2tog. – {106 sts}
Row 4: (P to marker, remove marker, p2, replace marker) 2 times, p to end. – {106 sts}
Row 5: K to second marker, wrap and turn. – {70 sts worked}
Row 6: P to end. – {70 sts worked}
Row 7: K to first marker, wrap and turn. – {36 sts worked}
Row 8: P to end. – {36 sts worked}
Row 9: K until 4 sts remain, picking up and working wraps as they are reached, k2tog, k2tog. – {104 sts}
Row 10: (P to marker, remove marker, p2, replace marker) 2 times, p to end. – {104 sts}
Row 11: K to second marker, turn, do not wrap. – {68 sts worked}
Row 12: P to end. – {68 sts worked}
Row 13: K to first marker, turn, do not wrap. – {34 sts worked}
Row 14: P to end, co 4. – {38 sts worked}
Row 15: K4, (k2tog, yo) until 4 sts remain, k2tog, k2tog. – {106 sts}
Row 16: (P to marker, remove marker, p2, replace marker) 2 times, p to end. – {106 sts}
Row 17: K to second marker, wrap and turn. – {70 sts worked}
Row 18: P to end. – {70 sts worked}
Row 19: K to first marker, wrap and turn. – {36 sts worked}
Row 20: P to end. – {36 sts worked}
Row 21: K until 4 sts remain, picking up and working wraps as they are reached, k2tog, k2tog. – {104 sts}
Row 22: (P to marker, remove marker, p2, replace marker) 2 times, p to end. – {104 sts}
Row 23: K to second marker, wrap and turn. – {68 sts worked}
Row 24: P to end. – {68 sts worked}
Row 25: K to first marker, wrap and turn. – {34 sts worked}
Row 26: P to end, co 4. – {34 sts worked}
Row 27: K until 4 sts remain, picking up and working wraps as they are reached, k2tog, k2tog. – {106 sts}
Row 28: (P to marker, remove marker, p2, replace marker) 2 times, p to end. – {106 sts}
Row 29: K to second marker, wrap and turn. – {70 sts worked}
Row 30: P to end. – {70 sts worked}
Row 31: K to first marker, wrap and turn. – {36 sts worked}
Row 32: P to end. – {36 sts worked}
Row 33: K until 4 sts remain, picking up and working wraps as they are reached, k2tog, k2tog. – {104 sts}
Row 34: (P to marker, remove marker, p2, replace marker) 2 times, p to end. – {104 sts}
Row 35: K to second marker, turn, do not wrap. – {68 sts worked}
Row 36: Slip first st purlwise, p to end. – {68 sts worked}
Row 37: K to first marker, turn, do not wrap. – {34 sts worked}
Row 38: Slip first st purlwise, p to end, co 4. – {38 sts worked}
Switch to color B, repeat rows 15-38, two times.
Switch to color A, repeat rows 15-38, two times.
Switch to color C, repeat rows 15-38, two times.
Switch to color A, repeat rows 15-38, two times.
Switch to color D, repeat rows 15-38, two times.
Switch to color A, repeat rows 15-38, two times.
Switch to color E, repeat rows 15-38, two times.
Switch to color A, repeat rows 15-38, two times.
Switch to color F, repeat rows 15-38, two times.
Switch to color A, repeat rows 15-37, then move onto finishing rows.
Finishing Rows
Row 1: Slip first st purlwise, p to end. – {34 sts worked}
Row 2: (K2tog, yo) until 4 sts remain, k2tog, k2tog. – {102 sts}
Row 3: P to end. – {102 sts}
Bind off knit wise. Weave in all ends.
Block. I gave mine a rinse in Unicorn Fibre Rinse, gently squeezed the water and rinse out, then blocked it flat and let it dry for 2 days (it’s a bit humid right now, hence the 2 days to dry). It worked wonderfully!
Wear or give and enjoy!

If you enjoy what you have found here at JessieAtHome, please like my Facebook page to get all the updates on new tutorials, other posts, sales, and coming events.
If you have any questions or concerns, want to share pictures of your work, or just want to chat with Jessie and other crafty individuals, than join my Facebook group.
If you enjoy this free crochet pattern, please consider buying some of your supplies from one of these affiliate links. Thank you.

©Copyright 2015 Jessie Rayot / Jessie At Home All my videos, patterns and posts are my own work. Do not copy them in any way. If you want to share this information with someone, share the link to this post. If you want to share on your own blog / website, then you may use the first photo in this post and link back to this post. You may not give away printed copies of this post. Thank you.
This post may contain affiliate links/ads. If you purchase something from a link in this post, I may be compensated.


totally in love with the yarn, the stitch and the style of this Skylark Through the looking glass shawl! thanks for sharing with us !
I love the look of this pattern and am just starting it. I was surprised in Row 10 where it gives instructions to K2 in the middle of the purl row, twice. After reading through the rest of the pattern and seeing all similar rows with P2 in that specific sequence, I decided to change the K2’s to P2’s, since it would be the only occurrence of it in the entire pattern.
Oh, my!! You found a typo, thank you so much for letting me know. I switched it to P2. 🙂
I don’t know what you’ve got on this page, but the first time I tried to load it, Firefox froze so bad I had to kill it from the task manager, and I nearly ended up killing it again because of a non-responsive script.
I don’t know what to tell you, I’ve never had that complaint before. Maybe it was another tab you had open causing problems?
Hi Jessie!
Absolutelylove this pattern! however, I do not knit and was wondering if you had something very similar in crochet?
https://jessieathome.com/skylark-in-wonderland/
I love this pattern. I had a lot of left over 4 ply yarn when I made 240 beanies for the kids at my son’s school to celebrate school reopening, so I am adjusting your pattern for needle size, number of stitches, and yarn weight. I have one set of 38 rows done and it looks great. As my husband would say “you done good” which translates to great job. Thanks for helping me to maintain my sanity during this “new normal”. Stay safe and be well, June
Awesome!!! I’m so glad you made it work for you. If you’re on Facebook, share some photos in my group. I’d love to see. 🙂
I haven’t done a lot of short row work but what I’ve done I’ve used German short rows. Can I use that here in place of the wrap & turn?
I don’t see why not, it should work fine.