Inside: Create a charming crochet bread basket to enhance your table and keep your meals organized. Learn how to make your own today.

This pattern was originally published on 6/20/15. The most recent update was made on 7/3/25.
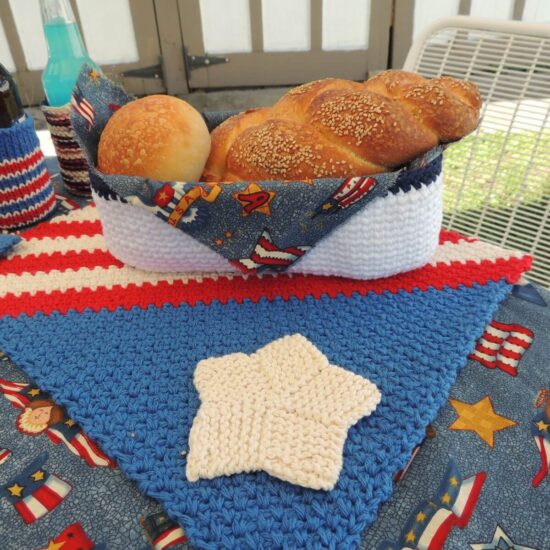
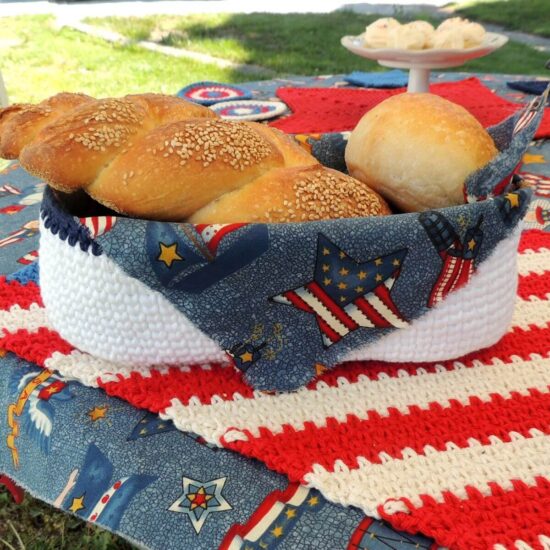
Crochet bread baskets add a handmade touch to any table, whether you’re hosting dinner or just treating yourself to a cozy breakfast. These baskets keep bread warm and ready to grab, and they work for way more than just bread. I’ve used mine for everything from chips to pretty little rolls wrapped in napkins to utensils and napkins for gatherings. I’m excited to walk you through all the details for making your own crochet bread basket, including supplies, tips, pattern notes, and the complete step-by-step pattern.
Even if you’re new to crocheting, this is a fun and manageable project. The finished basket range from about 8.75 inches long, 4.25 inches wide, and 3 inches tall to about 11.75 inches long, 6.5 inches wide, and 5 inches tall, with the height being just a suggestion, it’s entirely up to you. You also get to pick the yarn and the color combination, so your basket can match your kitchen or be a bold accent. If you want a project you can finish in a weekend but that’s still super useful, this is it.
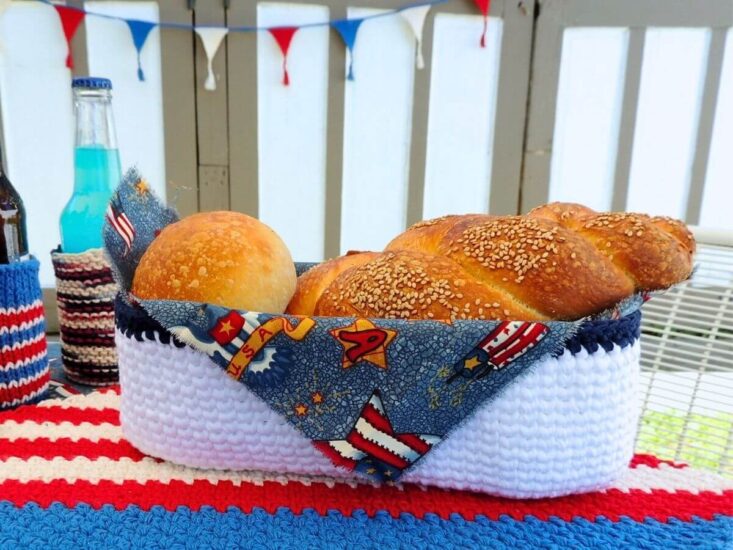
Table of contents
- Choosing the Right Yarn and Supplies
- Understanding Stitches and Abbreviations
- Helpful Tips Before You Start
- Get the Ad-Free Printable PDF at These Sites
- Supplies & Stats
- Stacked Bread Baskets Crochet Pattern
- Finishing Off and Care
- Creative Ways to Use Your Crochet Basket
- Common Crochet Questions & Tips
- Next Steps: Make the Pattern Yours
This pattern was originally written as part of the Patriotic Party CAL/KAL.
Choosing the Right Yarn and Supplies
I’ve found that working with bulky yarn is the way to go. It helps the basket hold its shape and makes the project come together faster. Any yarn that’s washable and not too fuzzy works well. Fuzzy yarns tend to shed, which isn’t ideal around food. Instead, I recommend sturdy, smooth yarn, something like a cotton blend or an acrylic that feels stiff when crocheted tightly. Cotton-blend yarns are easy to care for and look fresh even after washing, while acrylics give a sturdy finish and are budget-friendly.
For my sample I made size 3 and used about XX yds of bulky yarn, and added a contrasting color on the very last round for a fun accent. The original yarn I used isn’t available anymore, so I made a new sample with a current yarn, but any bulky weight will do as long as it gives you a firm texture. This type of basket doesn’t need to be super exact, so you’ve got a lot of wiggle room for experimentation. If you’re stash-busting, you could even mix and match leftover yarns for a striped look.
Hook, Gauge, and Extra Tools
- Hook size: US I/9/5.5mm
- Gauge: 15 stitches x 16 rows in a 4″ square (using single crochet, but honestly, being close is good enough for a bread basket!)
- Extras: Yarn needle for weaving in ends, one crochet stitch marker
Some crocheters like to keep a pair of small scissors in their kit for trimming ends, and a tape measure helps make sure your basket comes out to the size you want. Don’t stress about being perfect, though. The joy is in the making and customizing.
Understanding Stitches and Abbreviations
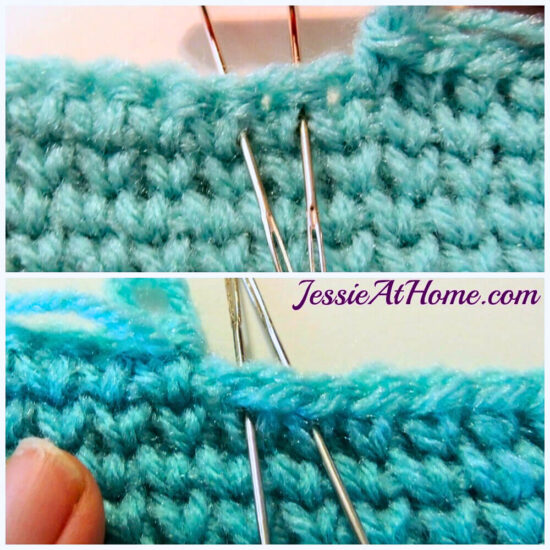
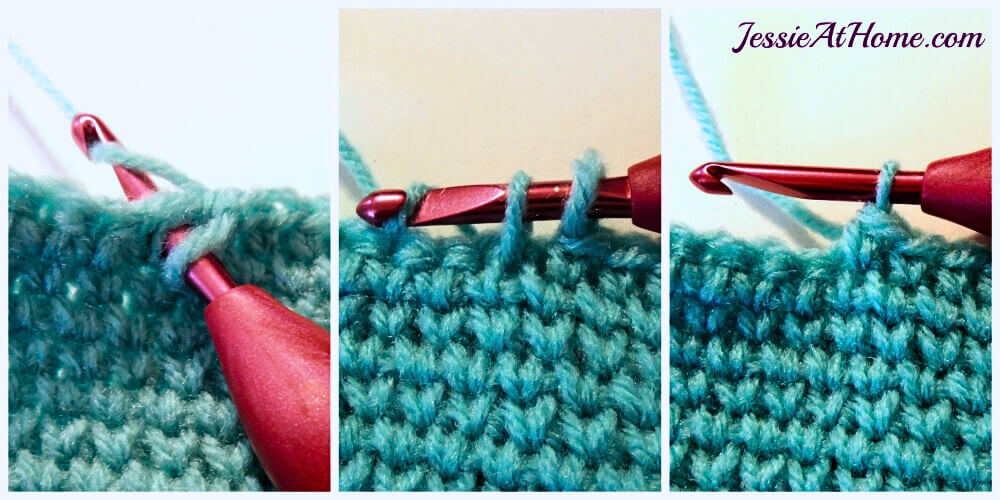
The main stitch for the sides is the split single crochet (ssc), also known as the waistcoat stitch. It creates a firm, knit-like texture that looks polished and helps your basket stand up on its own. If you haven’t used it before, it’s worth learning. Here’s a quick rundown on the basic terms you’ll see in the pattern:
- ch: chain
- sc: single crochet
- sl st: slip stitch
- ssc: split single crochet (waistcoat stitch)
- st(s): stitch(es)
How to Make the Split Single Crochet Stitch
With ssc, you insert the hook under the top loops and also pick up the vertical bar below them, right in between the “legs” of the previous stitch. If you picture the “V” made by each stitch, you’re working the hook right between the lines of the V, not just under the usual top two loops. This gives the basket a cool, clean look and a sturdy feel. Take a moment to practice on a small swatch if you’re unfamiliar—it’ll quickly click and give you much cleaner results on your main basket.
Helpful Tips Before You Start
- Give the pattern a quick read-through before picking up your hook. Knowing what’s ahead helps avoid surprises.
- For this project, it’s totally okay to have a stitch or two off. The basket will still hold bread just fine.
- Chains and slip stitches generally aren’t counted in your row totals unless you’re told otherwise.
- If you want to jazz up your basket, do the last round in a pop of color. You can even finish it with a thinner yarn to keep the basket edge tight.
- If your hands get tired, take short breaks while working. Bulky yarns sometimes need a little more grip and tension, so treat yourself kindly.
- Consider using a stitch marker; this little tool makes it so much easier to mark the first or last stitch as you work in a spiral.
- While you want your stitches tight, if you’re having trouble getting your hook in for the ssc, you may need to loosen up your tension. if your hook doesn’t have a pointy tip, changing to one that does can help a well.
Get the Ad-Free Printable PDF at These Sites
- Crochet Foundry (Buy direct from me!)
Supplies & Stats
Size
1 (2, 3, 4)
Finished Measurements
Length: 8.75 (9.75, 10.75, 11.75) in / 22 (25, 27.5, 30) cm
Width: 4.25 (5, 5.75, 6.5) in / 11 (12.5, 14.5, 16.5) cm
Height (suggested): 3 (3.25, 3.5, 3.75) in / 7.5 (8.5, 9, 9.5) cm
Yarn
Bernat Maker: (72% cotton, 28% nylon), size 5 / Bulky weight, 317 yds / 290 m, 8.8 oz / 250 g per skein
The original sample was made with 150g (3 balls) of Tahki Capri, and the final round was made with Tahki Chat. These yarns have since been discontinued. Any bulky yarn that gets the proper gauge with a stiff result will work.
Crochet Hook
US I/9 (5.5 mm)
Gauge
Learn about gauge HERE
15 sts by 16 rows in a 4″ square in sc. However, close is good enough as this is a bread basket, not a fitted item.
Other Supplies
- Crochet Stitch Marker
- Yarn Needle
Stitches and Abbreviations
click on highlighted sts for tutorials
ch: chain
pm: place marker
sc: single crochet
sl st: slip stitch
ssc: split single crochet AKA waistcoat stitch
st(s): stitch(es)
Special Stitches
split single crochet (ssc): Insert hook under the top loops AND the loop below the top loops, placing hook in between the 2 “legs” of the stitch. See the first photos below for where the hook is inserted, and the second photos to see how the stitch is made:
Pattern Notes
- Read through all instructions before beginning.
- The stitch count is at the end of each rnd after the period, usually only if the count has changed from the previous rnd. [count here]
- Chs and sl sts are not included in stitch counts unless specified.
Stacked Bread Baskets Crochet Pattern
Easy Crochet Pattern
Designed by Jessie Rayot
Basket Bottom
Rnd 1: Ch 21, 2 sc in back loop of second chain, sc in back loop of next 19 ch, rotate piece, 2 sc in unworked top loop of last ch worked, sc in unworked top loop of next 19 ch, pm in top of last st made, do not join. [42 sts]
Rnd 2: 2 Sc in each of the next 2 sts, sc in each of the next 18 st, 2 sc in each of the next 3 sts, sc in each of the next 18 st, 2 sc in the next st, pm in top of last st made. [48 sts]
Rnd 3: [2 Sc in next st, sc in next st] 2 times, sc in each of the next 18 st, [2 sc in next st, sc in next st] 3 times, sc in each of the next 18 st, 2 sc in next st, sc in next st, pm in top of last st made. [54 sts]
Rnd 4: [Sc in each of the next 2 sts, 2 sc in next st] 2 times, sc in each of the next 18 st, [sc in each of the next 2 sts, 2 sc in next st] 3 times, sc in each of the next 20 st, 2 sc in next st, pm in top of last st made. [60 sts]
Rnd 5: [2 Sc in next st, sc in each of the next 3 sts] 2 times, sc in each of the next 18 sts, [2 sc in next st, sc in each of the next 3 sts] 3 times, sc in each of the next 18 st, 2 sc in next st, sc in each of the next 3 sts, pm in top of last st made. [66 sts]
Rnd 6: [Sc in each of the next 4 sts, 2 sc in next st] 2 times, sc in each of the next 18 sts, [sc in each of the next 4 sts, 2 sc in next st] 3 times, sc in each of the next 22 sts, 2 sc in next st, pm in top of last st made. [72 sts]
Rnd 7: [2 Sc in next st, sc in each of the next 5 sts] 2 times, sc in each of the next 18 sts, [2 sc in next st, sc in each of the next 5 sts] 3 times, sc in each of the next 18 st, 2 sc in next st, sc in each of the next 5 sts, pm in top of last st made. [78 sts]
Rnd 8: [Sc in each of the next 6 sts, 2 sc in next st] 2 times, sc in each of the next 18 sts, [sc in each of the next 6 sts, 2 sc in next st] 3 times, sc in each of the next 24 sts, 2 sc in next st, pm in top of last st made. [84 sts]
Rnd 9: [2 Sc in next st, sc in each of the next 7 sts] 2 times, sc in each of the next 18 sts, [2 sc in next st, sc in each of the next 7 sts] 3 times, sc in each of the next 18 st, 2 sc in next st, sc in each of the next 7 sts, pm in top of last st made. [90 sts]
Rnd 10: [Sc in each of the next 8 sts, 2 sc in next st] 2 times, sc in each of the next 18 sts, [sc in each of the next 8 sts, 2 sc in next st] 3 times, sc in each of the next 26 sts, 2 sc in next st, pm in top of last st made. [96 sts]
Rnd 11: [2 Sc in next st, sc in each of the next 9 sts] 2 times, sc in each of the next 18 sts, [2 sc in next st, sc in each of the next 9 sts] 3 times, sc in each of the next 18 st, 2 sc in next st, sc in each of the next 9 sts, pm in top of last st made. [102 sts]
Rnd 12: [Sc in each of the next 10 sts, 2 sc in next st] 2 times, sc in each of the next 18 sts, [sc in each of the next 10 sts, 2 sc in next st] 3 times, sc in each of the next 28 sts, 2 sc in next st, pm in top of last st made. [108 sts]
Rnd 13: [2 Sc in next st, sc in each of the next 11 sts] 2 times, sc in each of the next 18 sts, [2 sc in next st, sc in each of the next 11 sts] 3 times, sc in each of the next 18 st, 2 sc in next st, sc in each of the next 11 sts, pm in top of last st made. [114 sts]
Rnd 14: [Sc in each of the next 12 sts, 2 sc in next st] 2 times, sc in each of the next 18 sts, [sc in each of the next 12 sts, 2 sc in next st] 3 times, sc in each of the next 30 sts, 2 sc in next st, pm in top of last st made. [120 sts]
Basket Edge
Set Up: Sl st in next st.
Fasten off.
Rnd 1: Make a slip knot in yarn, do not place on hook, insert hook from RS to WS under both loops of any st of final round of Basket Bottom, place loop on hook, pull up loop, sl st in each remaining st around, sl st in first sl st to join. [84 (96, 108, 120) sl sts]
Fasten off.
Basket Sides
Rnd 1: Join yarn with sl st to any sl st of Basket Edge, sc in next st, sc in each st around, do not join, pm in top of last st made. [84 (96, 108, 120) sts]
Rnd 2: Ssc in each st around, pm in top of last st made.
Continue repeating Rnd 2 until your basket reaches the height you like. I find that 3-4 inches is a nice standard height for holding an average loaf, but you can keep going for a taller basket or stop earlier if you want a shallow tray.
Sl st in next st.
Fasten off.
Finishing Off and Care
- Weave in your yarn ends with a yarn needle once you’ve reached your final height and completed your last round.
- You can starch the basket if you want it extra stiff, but mine hold up well without starching.
- If your basket loses its shape after washing, just shape it by hand and let it air dry. A little steaming (without getting the yarn too wet) also brings back crisp edges. You can also re-starch if needed.
These baskets are sturdy, but be mindful of how much weight you put in them. Light loaves, buns, or snacks work best, and lining with a napkin protects the stitches from crumbs and oils. If you use a non food-safe starch, you will definitely want to like the basket.
Creative Ways to Use Your Crochet Basket
- Lining with a fabric napkin or parchment sheet makes cleanup easy and prevents crumbs from sticking. It’s also a cute way to show off your style—pick a pattern that matches your home or the season.
- These baskets aren’t just for bread! They’re great for serving chips, holding wrapped candies, or even corralling craft supplies, keys, or mail near an entryway.
- I like to give them as housewarming gifts. Fill one with a fresh loaf and a jar of jam, and you’ve got a thoughtful, practical present that people will really use. You could customize the colors for the recipient for an extra special touch.
- Kids love using these baskets for pretend picnics. They’ll appreciate the squishy, soft structure as much as you’ll love the easy machine-wash care.
Common Crochet Questions & Tips
What if my basket isn’t stiff enough?
Try a smaller hook, crochet tighter, or switch to bulkier yarn. You can also run a couple of rounds with a slightly thinner yarn at the very top to keep the rim snug. If you’re still not happy with the stiffness, stitch a fabric liner inside and insert a cut piece of cardboard between layers (just don’t wash with the cardboard inside!). I found that for the larger sizes I like to sandwich a piece of cardboard or chipboard between the bottom of the basket and a piece of fabric or felt.
Can I adjust the size of the basket?
Absolutely! To make it longer or shorter, start with more or fewer chains in the base, then follow the pattern as written. To make it thicker or thinner, make more or less rounds on the base. Adjust the height by adding more side rounds for a taller basket or stopping sooner for a shorter one. Altering the base is a great way to make different shapes—long and skinny for baguettes, or short and wide for rolls.
My stitches look messy, what helps?
- Practice the split single crochet on a swatch before starting for real. This stitch can feel awkward at first, but it quickly gets easier and gives a nice, uniform look.
- Stitch markers are your friend for keeping track of rounds. Use them to mark the top of the last stitch of each round, especially on the bottom, so your increases stay where they should be.
- Tidy up the finished basket by starching, especially if you want super straight sides. Let the basket dry upside down with the sides hanging free by placing it over a large book standing up (covered with some plastic to protect it).
Getting a tidy result is easier if you keep an even tension throughout, but remember—this is a functional, homey piece, so little imperfections just add character!
Next Steps: Make the Pattern Yours
- Experiment with color combos or try a patterned stripe with leftover yarn. Each version will have its own unique flair.
- If you want, switch to a contrasting color for the last round. This little tweak is totally optional, but it does help the rim look next-level cool. For a even more finished look, finish the sides as written, then add the final round in a contrasting color, so there is no jog where the color changes.
- Add a fabric liner, or sew on a simple handle to turn your basket into a little caddy, perfect for carrying snacks or supplies from room to room.
- Don’t forget to tag your creations on social media; there’s a friendly crochet community that loves seeing fresh takes on classic patterns! Sharing your personal twist might even inspire someone else to pick up their hook. #JessieAtHome #CrochetFoundryMakes #AtTheFoundry
- Share in our Discord server as well, you may get shared on our social media!
- You can also embroider a little motif onto the finished basket for some personalization, or attach a handmade tag for a gift-ready look.
Ready to start your own crochet bread basket? Gather your yarn, grab your hook, and enjoy making something you can use every day or give as a handmade gift. I’d love to see how yours turns out! Happy crocheting and creating baskets you’ll reach for again and again.
Happy Stitching!
Did you enjoy what you found here at Jessie At Home? Then sign up for my newsletter and like my Facebook page, so you’ll get all the updates on new tutorials, other posts, sales, and coming events.
If you have any questions, want to share pictures of your work, or just want to chat with Jessie and other crafty individuals, than join one of our free Zoom Sit & Stitches. Find them on our Events Calendar.

© Copyright 2015 Jessie Rayot / Jessie At Home®, LLC All my videos, patterns, charts, photos and posts are my own work, so you may not copy them in any way. If you want to share this information with someone, then share the link to this post.


I like all of your patterns.
Thank you!
love, love, love your patterns
THANK YOU!! You made my day. <3