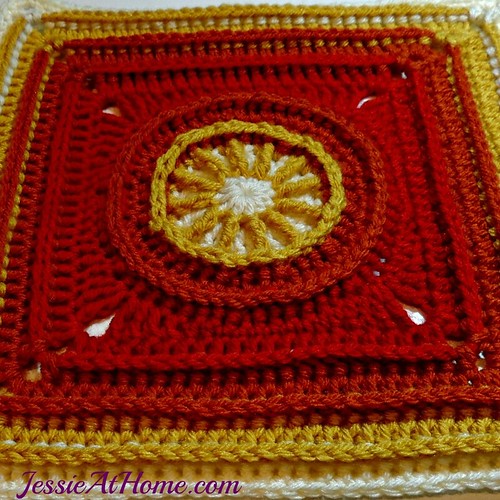
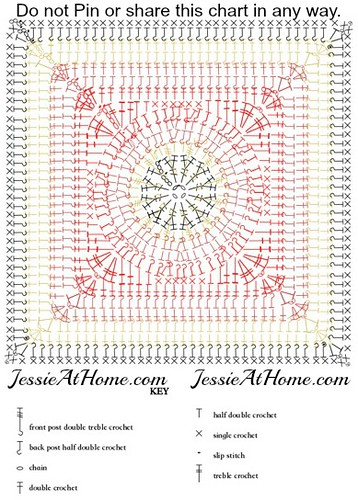
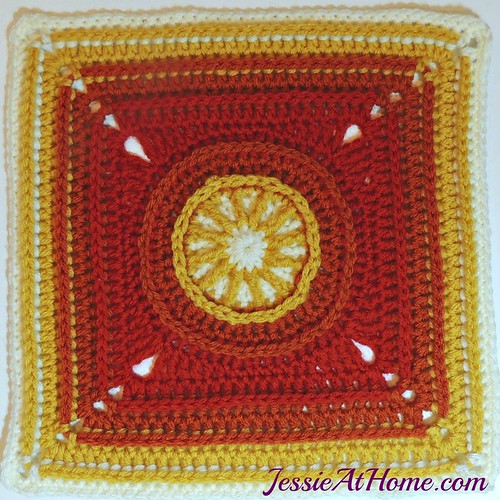
The Flame Square is full of post stitches and awesome texture! Grab your “I” hook and Vanna’s choice yarn in these firey colors and create this bright square for yourself. This square would also look wonderful in one solid color. Make several in each of 3 or 4 neutral colors and join them into a unisex blanket sure to wrap anyone in love! I have included a link for a post st tutorial (along with links for tutorials for most of the other sts) and a chart to help you along.
Flame Square
Crochet Pattern
Intermediate Skill Level
Designed by Jessie Rayot
Le patron est disponible en français, merci à Véronique Malanda Mavouala! Cliquez ici pour voir la version PDF.
Size:
12″ square
Yarn:
Lion Brand Vanna’s Choice
Beige #123: A
Mustard #158: B
Terracotta #134: C
Scarlet #113: D
Hook:
US 9/I/5.50 mm
Gauge:
13 sts and 6.5 rows makes a 4” square in double crochet
Other supplies:
yarn needle
Stitches and Skills used:
ch – chain
dc – double crochet
hdc – half double crochet
sc – single crochet
sl st – slip stitch
st(s) – stitch(es)
tr – treble crochet
yo – yarn over
Special Stitches:
back post half double crochet (bphdc): Yo, insert hook from back to front, and then from front to back again around the post of the stitch you are working into, pushing that stitch to the back, yo, pull through (3 loops on hook), yo, pull through all 3 loops.
front post double treble crochet (fpdtr): Yo three times, insert hook from front to back, and then from back to front again around the post of the stitch you are working into, pushing that stitch to the front, yo, pull through (5 loops on hook), yo, pull through 2 (4 loops on hook), yo, pull through 2 (3 loops on hook), yo, pull through 2 (2 loops on hook), yo, pull through last 2 loops.
Getting Started:
A tutorial on post stitches, which may help, can be found here.
Pattern:
With A, ch 4, sl st in first ch to form a ring.
Rnd 1: Ch 3 (counts as first dc), work 11 dc in ring, sl st to top of beginning ch-3.- {12 sts}
Rnd 2: Ch 3 (counts as first dc), dc in same st, 2 dc in each st around, change to B, sl st to top of beginning ch-3.- {24 sts}
Rnd 3: Ch 1 (does not count as a st), hdc in same st, [fpdtr around dc below in rnd 1, hdc in each of next 2 sts] 11 times, fpdtr around dc below in rnd 1, hdc in last st, sl st to first hdc.- {36 sts}
Fasten off B and weave in ends, rnd 4 will be easier to work this way.
Rnd 4: Make a slip knot on hook with C, bphdc around any st, bphdc around next st, 2 bphdc around next st, [bphdc around each of next 2 sts, 2 bphdc around next st] 11 times, sl st to first bphdc.- {48 sts}
Rnd 5: Ch 1 (does not count as a st), 2 hdc in same st, hdc in each of next 5 sts, [2 hdc in next st, hdc in each of next 5 sts] 7 times, sl st to top of beginning ch-2.- {56 sts}
Fasten off C and weave in ends, rnd 6 will be easier to work this way.
Rnd 6: Make a slip knot on hook with D, bphdc around any st, bphdc around each of next 5 sts, 2 bphdc around next st, [bphdc around each of next 6 sts, 2 bphdc around next st] 7 times, sl st to first bphdc.- {64 sts}
Rnd 7: Ch 6 (counts as first tr and ch 2 corner), [2 tr in next st, dc in each of next 2 sts, hdc in each of next 2 sts, sc in each of next 6 sts, hdc in each of next 2 st, dc in each of next 2 sts, 2 tr in next st, ch 2] 3 times, 2 tr in next st, dc in each of next 2 sts, hdc in each of next 2 sts, sc in each of next 6 sts, hdc in each of next 2 sts, dc in each of next 2 sts, tr in same st as beginning ch 6, sl st to 4th ch of beginning ch-6. – {18 sts on each side with ch-2 corners}
Rnd 8: Sl st in ch-2 corner, ch 5 (counts as first dc and ch-2 corner), 2 dc in same ch-2 corner, [dc in each st to next corner, (2 dc, ch 2, 2 dc) in ch-2 corner] 3 times, dc in each st to next corner, dc in ch-2 corner, switch to C, sl st to 3rd ch of beginning ch-5. – {22 sts on each side with ch-2 corners}
Rnd 9: Sl st in ch-2 corner, ch 4 (counts as first hdc and ch-2 corner), hdc in same ch-2 corner, [bphdc in each st to next corner, (hdc, ch 2, hdc) in ch-2 corner] 3 times, bphdc in each st to next corner, sl st to 2nd ch of beginning ch-4. – {24 sts on each side with ch-2 corners}
Rnd 10: Sl st in ch-2 corner, ch 5 (counts as first dc and ch-2 corner), 2 dc in same ch-2 corner, [dc in each st to next corner, (2 dc, ch 2, 2 dc) in ch-2 corner] 3 times, dc in each st to next corner, dc in ch-2 corner, switch to B, sl st to 3rd ch of beginning ch-5. – {28 sts on each side with ch-2 corners}
Rnd 11: Sl st in ch-2 corner, ch 4 (counts as first hdc and ch-2 corner), hdc in same ch-2 corner, [bphdc in each st to next corner, (hdc, ch 2, hdc) in ch-2 corner] 3 times, bphdc in each st to next corner, sl st to 2nd ch of beginning ch-4. – {30 sts on each side with ch-2 corners}
Rnd 12: Sl st in ch-2 corner, ch 5 (counts as first dc and ch-2 corner), 2 dc in same ch-2 corner, [dc in each st to next corner, (2 dc, ch 2, 2 dc) in ch-2 corner] 3 times, dc in each st to next corner, dc in ch-2 corner, switch to A, sl st to 3rd ch of beginning ch-5. – {34 sts on each side with ch-2 corners}
Rnd 13: Sl st in ch-2 corner, ch 4 (counts as first hdc and ch-2 corner), hdc in same ch-2 corner, [bphdc in each st to next corner, (hdc, ch 2, hdc) in ch-2 corner] 3 times, bphdc in each st to next corner, sl st to 2nd ch of beginning ch-4. – {36 sts on each side with ch-2 corners}
Rnd 14: Sl st in ch-2 corner, ch 3 (counts as first sc and ch 2 corner), sc in same ch-2 corner, [sc in each st to next corner, (sc, ch 2, sc) in ch-2 corner] 3 times, sc in each st to next corner, sl st to 1st ch of beginning ch-3. – {38 sts on each side with ch-2 corners}
*optional – To get to 40 sc on each side, repeat Rnd 14 one more time.
Finish off and weave in all ends.
NEXT: Here’s another 12″ Square for you!
Did you enjoy what you found here at Jessie At Home? Then sign up for my newsletter and like my Facebook page, so you’ll get all the updates on new tutorials, other posts, sales, and coming events.
If you have any questions, want to share pictures of your work, or just want to chat with Jessie and other crafty individuals, than join my Facebook group.

© Copyright 2015 Jessie Rayot / Jessie At Home LLC All my videos, patterns, charts, photos and posts are my own work, so you may not copy them in any way. If you want to share this information with someone, then share the link to this post. If you want to share on your own blog / website, then you may use the first photo in this post and link back to this post. Also, you may not give away printed copies of this post.


Hi Jessie – loving the idea of finishing my sampler afghan with some flame squares, but I’m wondering if there’s a picture link issue as I can’t see any above. Thanks for all you do, too! Love your work xx
There’s nothing wrong with any of the pictures, it may be something on your end. You can also click on the Ravelry link at the top to see the pictures there, but it should work here as well.
Hi, I’m confused about round 3. Is it just repeating it self by accident with the fpdtr to the first round?? Or do I really do this twice?? Dosent look that way in the pic.
Rena – I see you got help with this while I was traveling today. I’m glad it makes sense to you now and I LOVE your finished square.
Okay, my count is fine on round 7, but I keep getting 21 st. instead of 22 on each side of round 8. What am I doing wrong??
It sounds like you added a st somewhere.
I’m having a hard time trying to convert to a PDF. I don’t want to print through Craftsy since the pattern is free. I can however download a PDF in French. I need it in English
At the bottom of the pattern there is an image for an ad free PDF, if you click that it will take you to Craftsy were you can get the ad free PDF. If you want to use print friendly or clean print, the instructions for that can be found in Moogly’s post for Square 1.
I am having a difficult time getting your page to work on print friendly, everytime I copy and paste your link it keeps saying Ack! Print technology unable to determine the content, everytime I put your link in.
Sorry about that. I don’t use Print Friendly, so I can’t help you with that. You can get the PDF from Craftsy, or you can cut and paste it into a doc yourself, and then print that.
I have a tutorial for the Jacob’s ladder, which you could use to make a crochet version. https://jessieathome.com/stitchopedia-jacobs-ladder-crochet/
HI,
I am having trouble with round 4. Do you do 2 bphdc in the same stitch? I know that is what it says but I am having a difficult time making 2 bphdc in the same stitch. Probably just my inexperience with this stitch. I watched the tutorial but it always shows just one stitch per stitch never 2. Am I missing something? Thanks
Yes, you do 2 in the same st, once you work around the post to do the first st, you just work around it again, so the base of the new st stacks right under the base of the first st.
Thank you so much for explaining, It worked!
Yay!!!