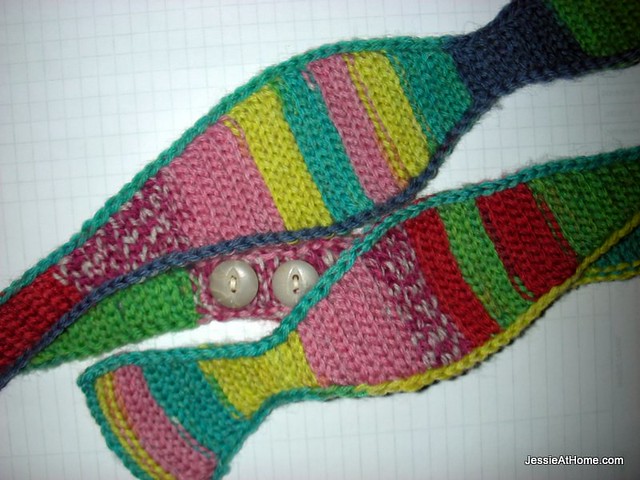
Bow ties are cool again! (OK, I’ve always thought they were cool) Make one for yourself, or a friend, with this fun crochet slip stitch pattern. The slip stitch gives a nice rib look, and keeps it from feeling too tight around your neck. Worked in two pieces, one with buttons at the end, and one with button holes at the end, this bow tie is adjustable so it fits a variety of sizes.
Slip Stitch Bow Tie
Crochet Pattern
Intermediate Skill Level
Designed by Jessie Rayot
Sizes:
One size fits most.
Yarn:
Sock weight/Size 1/Super Fine
Patons Kroy Socks used in the sample shown
Hook:
US D/3/3.25 mm
Stitches and Skills used:
Ch ~ chain
sl st ~ slip stitch
BLO ~ Back Loop Only
Sk ~ skip
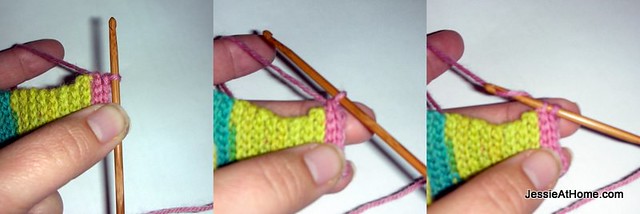
To get you started, here is a video that shows the techniques used in this pattern. I highly recommend watching this video first to help avoid errors.
Row 1: Ch 15, sk 1, sl st in bottom loop of each remaining ch across (14 sl sts)
Row 2 ~ 6: Ch 1, turn, sl st in the BLO of the first sl st, sl st in BLO of each remaining sl st. (14 sl sts)
Row 7: Ch 1, turn, sl st in the BLO of the second sl st, sl st in BLO of each remaining sl st. (13 sl sts)
Row 8: Ch 1, turn, sl st in the BLO of the second sl st, sl st in BLO of each remaining sl st. (12 sl sts)
Repeat rows 5 ~ 8: 4 more times (4 sl sts and 24 rows total at this point)
Row 25 ~ 30: Ch 1, turn, sl st in the BLO of the first sl st, sl st in BLO of each remaining sl st. (4 sl sts)
Row 31: Ch 1, turn, sl st in the BLO of the first sl st, sl st in BLO of each remaining sl st, sl st into the turning ch. (5 sl sts)
Row 32: Ch 1, turn, sl st in the BLO of the first sl st, sl st in BLO of each remaining sl st, sl st into the turning ch. (6 sl sts)
Repeat rows 29 ~ 32: 4 more times (14 sl sts and 48 rows total at this point)
Row 49 ~ 60: Ch 1, turn, sl st in the BLO of the first sl st, sl st in BLO of each remaining sl st. (14 sl sts)
Row 61: Ch 1, turn, sl st in the BLO of the second sl st, sl st in BLO of each remaining sl st. (13 sl sts)
Row 62: Ch 1, turn, sl st in the BLO of the second sl st, sl st in BLO of each remaining sl st. (12 sl sts)
Repeat rows 59 ~ 62: 4 more times (4 sl sts and 78 rows total at this point)
Middle
Row 1: Ch 1, turn, sl st in the BLO of the first sl st, sl st in BLO of each of the next 3 sl sts. (4 sl sts)
Repeat row 1 for 9” then begin button holes
Button Holes
Row 1: Ch 1, turn, sl st in the BLO of the first sl st, ch 2, sk 2, sl st in BLO of last sl sts. (sl st, 2 ch, sl st)
Row 2: Ch 1, turn, sl st in the BLO of the first sl st, sl st in BLO of next 2 ch, sl st in BLO of each of last sl sts. (4 sl sts)
Row 3 ~ 10: Ch 1, turn, sl st in the BLO of the first sl st, sl st in BLO of each of the next 3 sl sts. (4 sl sts)
Repeat rows 1 ~ 10 four more times, then row 1 one more time.
Edging: Ch 1, turn, sl st in the blo of the first st, sl st in the blo of each of the next 3 sts, ch 1, rotate piece, sl st along edge of piece by placing 1 sl st in the ch-1 at the edge of every other row, rotate, ch 1, sl st in blo of each ch along first row of piece, ch 1, , rotate piece, sl st along edge of piece by placing 1 sl st in the ch-1 at the edge of every other row, sl st to beg ch 1.
To make the second half of the bow tie: Work the same as the first half until you reach the button holes, continue working middle (no button holes added) until it is as long as the first half. Than move onto the edging.
To find a printer friendly version of this pattern (text only, in black, no photos) click here. This will bring you to the listing for this pattern on Craftsy, where you can also find printer friendly versions of all my free patterns, and where you can purchase my sale patterns.
If you enjoy what you have found here at JessieAtHome, please like our Facebook page to get all the updates on new tutorials, other posts, sales, and coming events.
©Copyright 2014 Jessie Rayot / Jessie At Home All my videos, patterns and posts are my own work. Do not copy them in any way. If you want to share this information with someone, share the link to this post. If you want to share on your own blog / website, then you may use the first photo in this post and link back to this post. You may not give away printed copies of this post. Thank you.


when i first saw this on ravelry, i thought it was knitted — good thing i know how to crochet too!
Slip Stitch crochet does do a pretty good impression of a 1:1 knit rib!
I get lost where it says “Repeat rows 5~6: 4 more times” because rows 5& 6 have 14 stitches. Do I decrease until I get down to 4 slip stitches, then repeat until I have a total of 24 rows done?
You found a typo!! I fixed it. You repeat rows 7 ~ 8 4 more times, which will bring you down to 4 sts. Sorry about that.
I still don’t get this step…if I repeat 7-8 four more times it only brings me to 16 rows at 4 sl sts…do I then continue the 4 sl sts until i have 24 rows?
Oh, my, I am so sorry, I corrected the typo wrong. It should be 5 ~ 8, so there are 4 rows repeated 4 times, making 16 more rows, which gets you to the correct number. Ugg.
I like this pattern, but when I decrease the second time dow to 4 sl sl I have 78 rows. I have been marking the rows on paper noting the # of stitches on certain rows so I don’t lose my place. My question is do make the 4 sl st rows for a length of 9 inches or until it is a total of 9 inches from the beginning, because then I have the button holes afterwards? Same question for the other side as well. Thanks.
You repeat row 1 for 9 inches, then you begin the button holes.
yup, i’m highly confused. 2 things… first:
where it says: Repeat rows 59 ~ 62: 4 more times (4 sl sts and 86 rows total at this point), i’ve counted several times and it never gets as high as 86 rows… at that point it should be 78 rows!
second: I’ve never made a bow tie, so please explain… is it all one continuous piece? or is the 2nd half made separately and they’re tied together?
thanks!
You’re right, it should be 78. The bow tie is 2 pieces that buttons together in the back so that it is adjustable.
thank you, i get it now 🙂