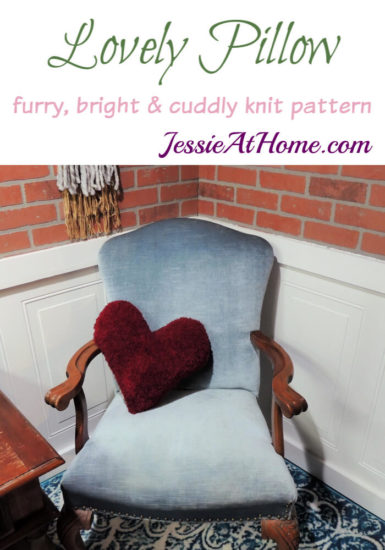
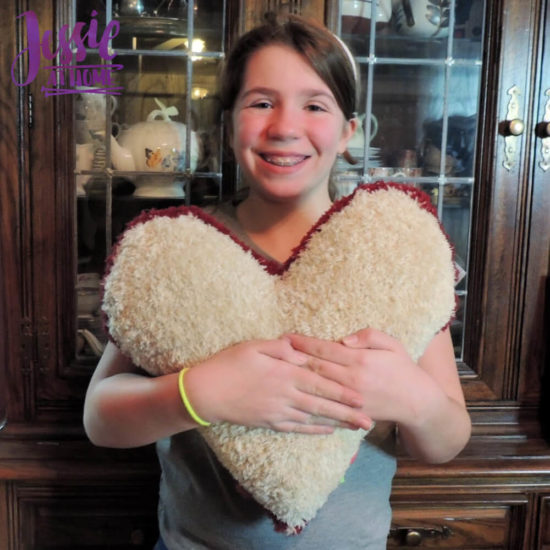
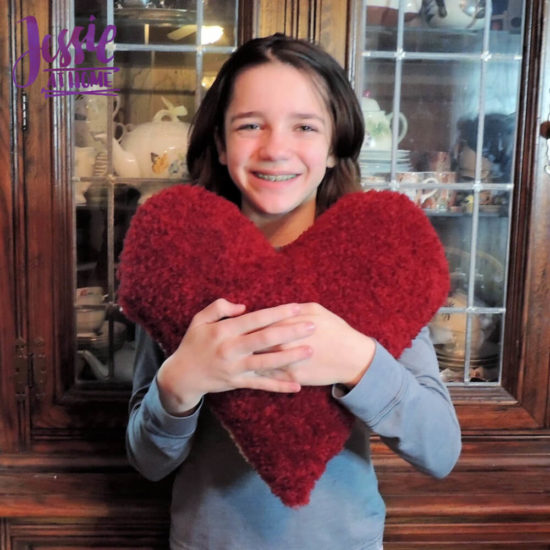
This lovely pillow is so cuddly and fluffy and furry and soft and awesome! Knit it for yourself, or knit it for a loved one to share the love. Each side is a different color, so you can make it for Valentine’s Day, or you can change up the colors to make it your own. The Red Heart Hygge Fur yarn is awesome and doesn’t shed like many fur yarns.

The yarn for this design was provided by Red Heart. All opinions are my own.
Lovely Pillow
Knit Pattern
Easy Skill Level
Designed by Jessie Rayot
Lovely Pillow Supplies
Size:
Approximately 17″ tall x 16″ wide
Yarn:
Red Heart Hygge Fur: (100% Nylon), Size 5 (10 wpi, worsted weight), 200 g / 260 yds
Sangria 0913: Color A – 1 skein, (95 g / 120 yds)
Sand Castle 0117: Color B – 1 skein, (95 g / 120 yds)
Needles:
US – 10, 6.0 mm
Gauge: Learn about gauge HERE
18 sts x 22 rows = 4” [10 cm] in Stockinette
Other supplies:
yarn needle
1 stitch marker
1 removable stitch marker or safety pin
poly-fil
fabric for insert optional
thread for insert optional
Stitches and Abbreviations: click on highlighted sts for tutorials
co – cast on
k – knit
kfb – knit in front and back (increase)
k2tog – knit 2 together (decrease)
p – purl
pm – place marker
p2tog – purl 2 together
st(s) – stitch(es)
Getting Started:
- Row counts are at the end of each row after the period, if the count has changed from the previous row. – {count here}
- Chs and sl sts are not included in Round/Row counts unless specified.
- Slip markers as they are reached unless otherwise noted.
Lovely Pillow Front and Back – make 1 in each color
Lovely Pillow Bottom
CO 3
Row 1: K1, kfb, k1. – {4 sts}
Row 2: P all.
Row 3: K1, kfb, pm, kfb, k1. – {6 sts}
Row 4: P all.
Row 5: K1, kfb, k until 2 sts remain, kfb, k1. – {8 sts}
Row 6: P all
At this point, pin removable stitch marker or safety pin on knit side to mark front.
Rows 7 – 68: Repeat Rows 5 & 6 thirty-one times. – {70 sts at end of Row 68}
Row 69: K all.
Row 70: P all.
Rows 71 – 76: Repeat Rows 69 & 70 three times.
Lovely Pillow First Top Section
Row 1: K to marker. – {35 sts}
Row 2: P all.
Rows 3 & 4: Repeat Rows 1 & 2.
Row 5: K1, k2tog, k to 3 sts before marker, k2tog, k1. – {33 sts}
Row 6: P all.
Rows 7 & 8: Repeat Rows 1 & 2.
Rows 9 – 18: Repeat Rows 5 & 6 five times. – {23 sts at end of Row 18}
Row 19: Repeat Row 5. – {21 sts}
Row 20: P1, p2tog, p until 3 sts remain, p2tog, p1. – {19 sts}
Rows 21 – 24: Repeat Rows 19 & 20 two times. – {11 sts at end of Row 24}
Bind off 11 sts knit wise, then fasten off.
Lovely Pillow Second Top Section
Join yarn before stitch marker, remove st marker.
Row 1: K all. – {35 sts}
Row 2: P all.
Rows 3 & 4: Repeat Rows 1 & 2.
Row 5: K1, k2tog, k to 3 sts before marker, k2tog, k1. – {33 sts}
Row 6: P all.
Rows 7 & 8: Repeat Rows 1 & 2.
Rows 9 – 18: Repeat Rows 5 & 6 five times. – {23 sts at end of Row 18}
Row 19: Repeat Row 5. – {21 sts}
Row 20: P1, p2tog, p until 3 sts remain, p2tog, p1. – {19 sts}
Rows 21 – 24: Repeat Rows 19 & 20 two times. – {11 sts at end of Row 24}
Bind off 11 sts knit wise, then fasten off.
Finishing (no insert version)
- With Color A, sew front and back of the Pillow together leaving a 4 – 6″ opening on one side. (Single crochet can be used instead of sewing if preferred.)
- Stuff Pillow well.
- Finish sewing Pillow shut.
Finishing with Pillow Insert (optional sewn Insert instructions)
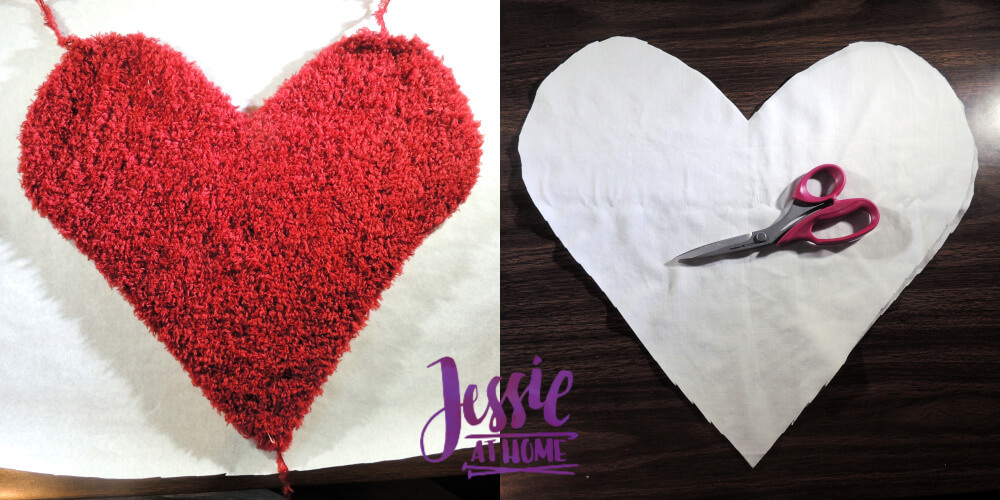
- Lay Pillow Front on paper to make a pattern. Trace around Pillow Front.
- Fold pattern in half and even out two sides splitting the difference if they are not the same.
- Cut out pattern 1/2″ larger then drawn line.
- Use pattern to cut 2 pieces of Insert Fabric.
- Place 2 Insert pieces together and sew together leaving a 4-6″ opening on one side. Use a 1/4″ seam allowance.
- Turn Insert so seams are on the inside.
- Stuff Insert well.
- Sew opening shut.
- With Color A, sew the “V” section (not the 2 bumps on the top of the heart) of the front and back of the Pillow together. (Single crochet can be used instead of sewing if preferred.)
- Place Insert inside the Pillow
- Finish sewing Pillow shut.
Weave in any remaining ends.
Use or give and enjoy!

If you are going to make this Lovely Pillow then get some supplies from these affiliate links.
Did you enjoy what you found here at Jessie At Home? Then sign up for my newsletter and like my Facebook page, so you’ll get all the updates on new tutorials, other posts, sales, and coming events.
If you have any questions, want to share pictures of your work, or just want to chat with Jessie and other crafty individuals, than join one of our free Zoom Sit & Stitches. Find them on our Events Calendar.

© Copyright 2020 Jessie Rayot / Jessie At Home®, LLC All my videos, patterns, charts, photos and posts are my own work, so you may not copy them in any way. If you want to share this information with someone, then share the link to this post.