Inside: Learn how to make a flower granny square with this free crochet pattern inspired by the That 70s Flower crochet applique pattern.
The yarn for this design was provided by Yarnspirations. All opinions are my own.
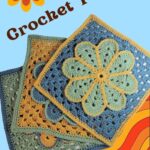
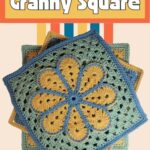
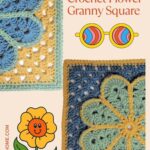
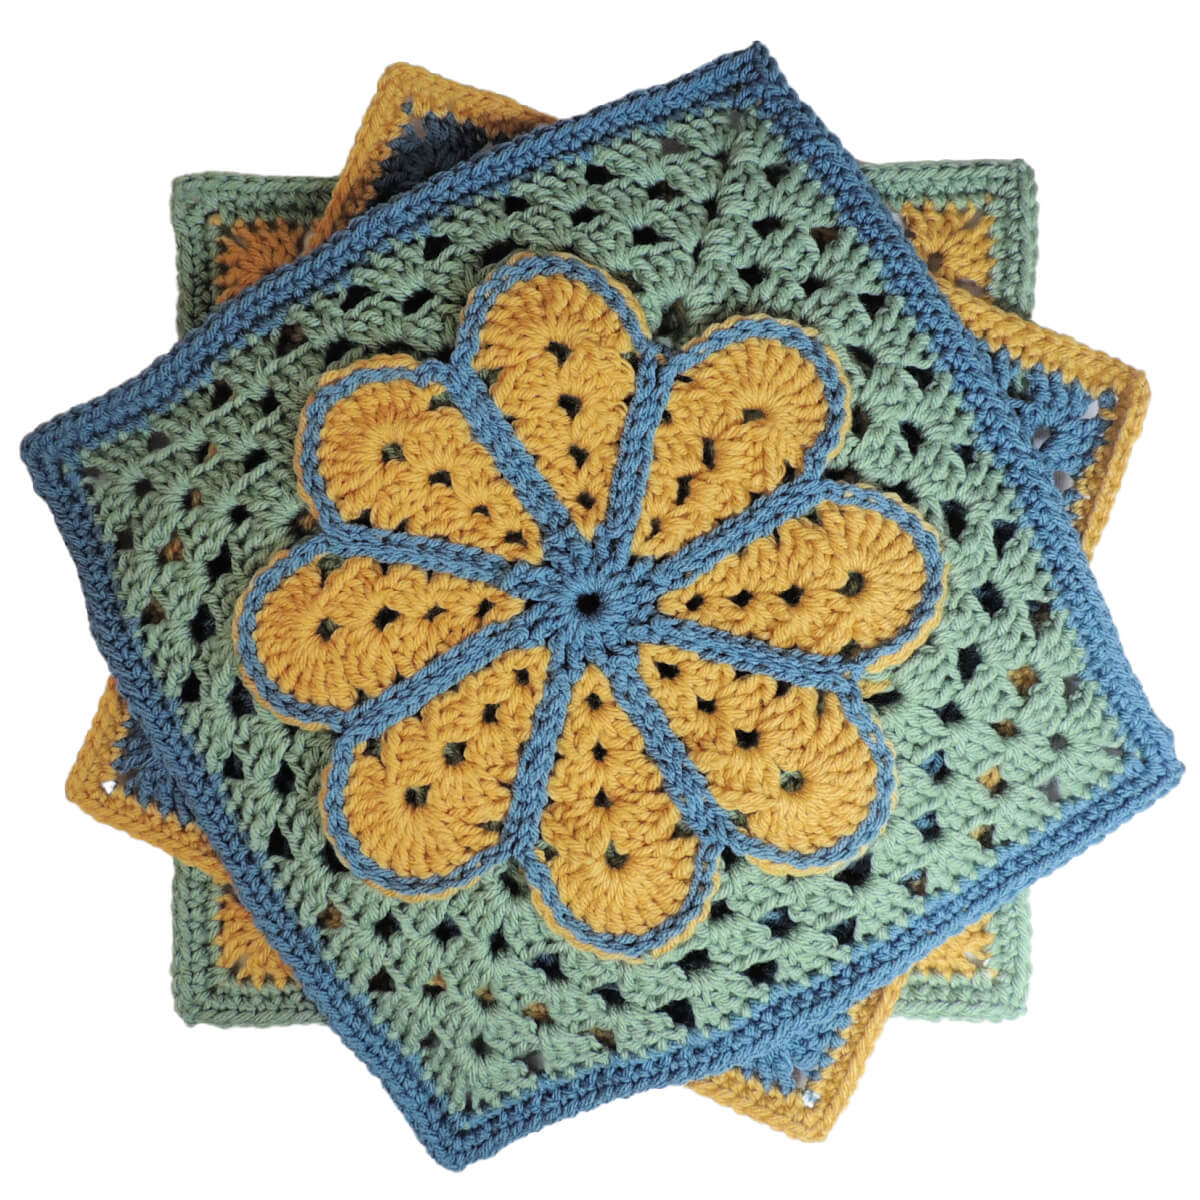
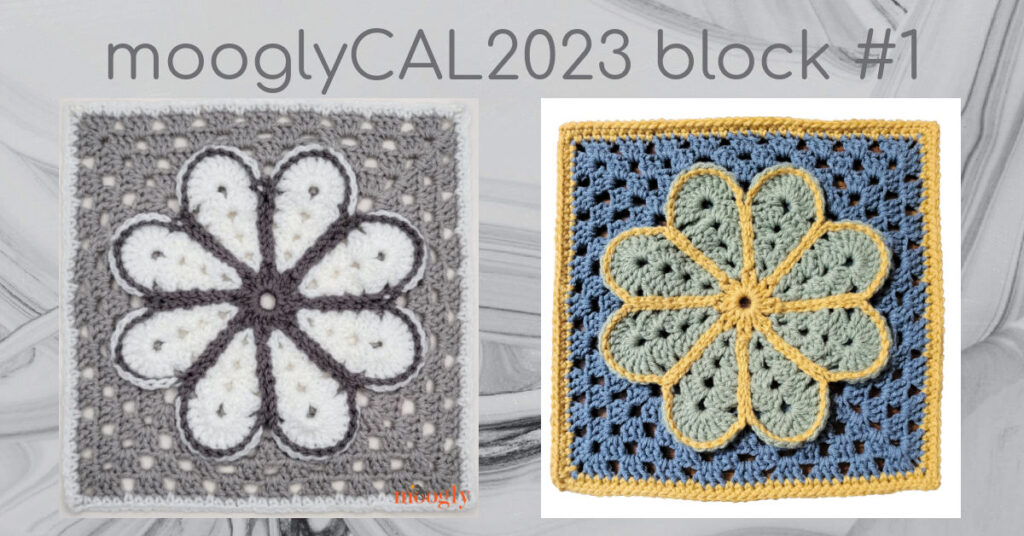
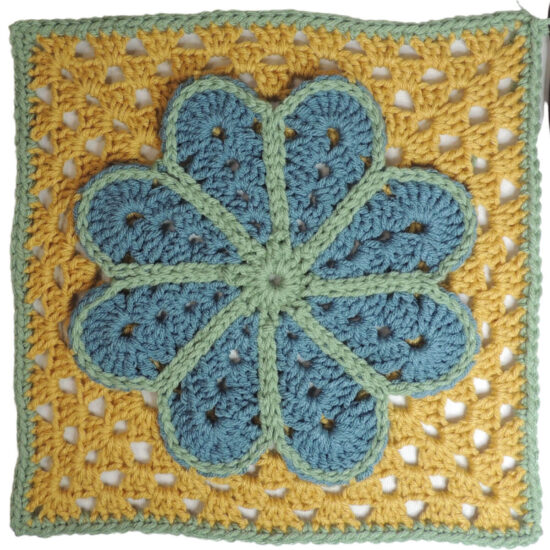
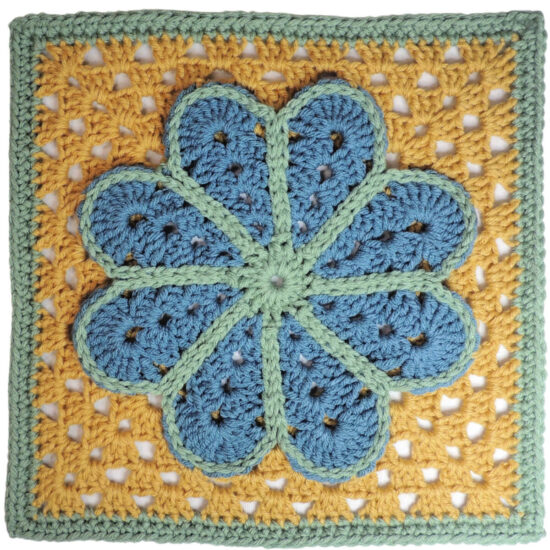
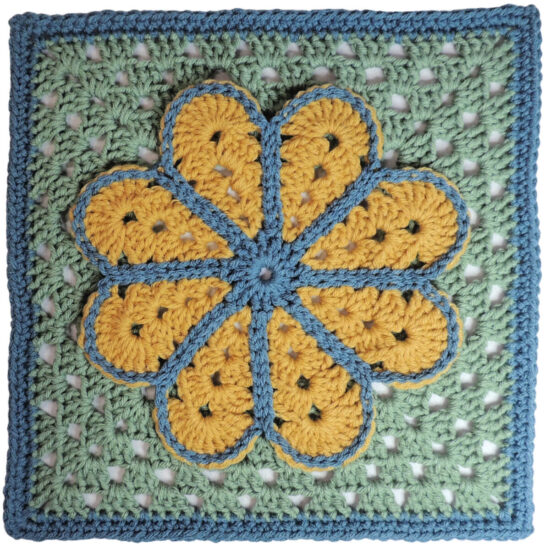
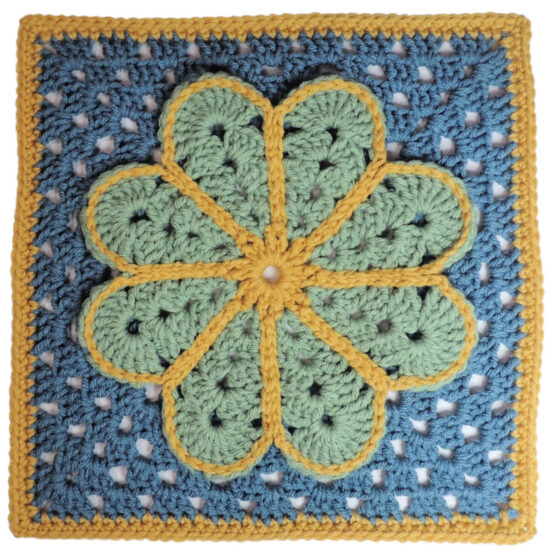
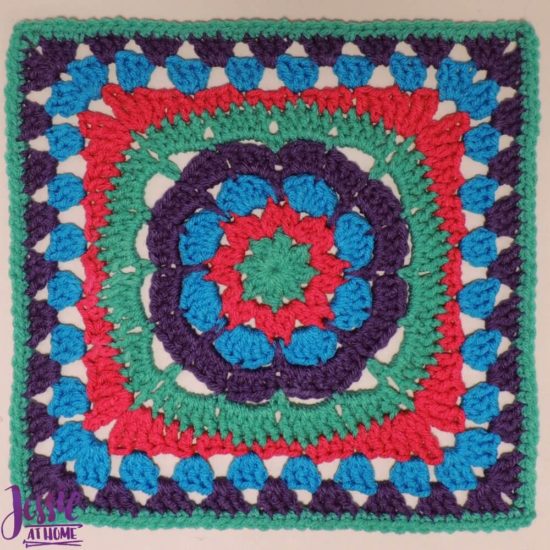
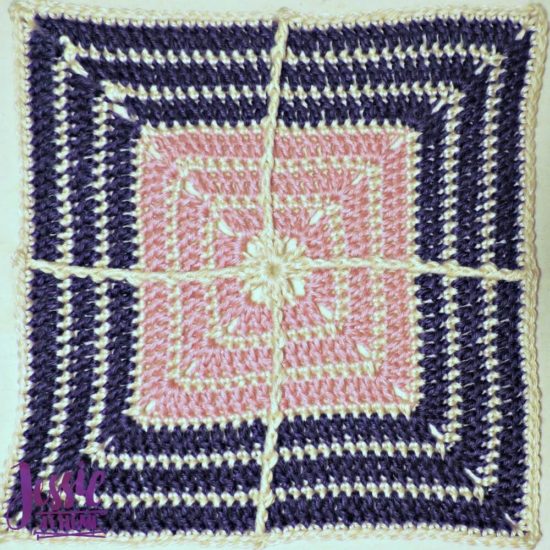
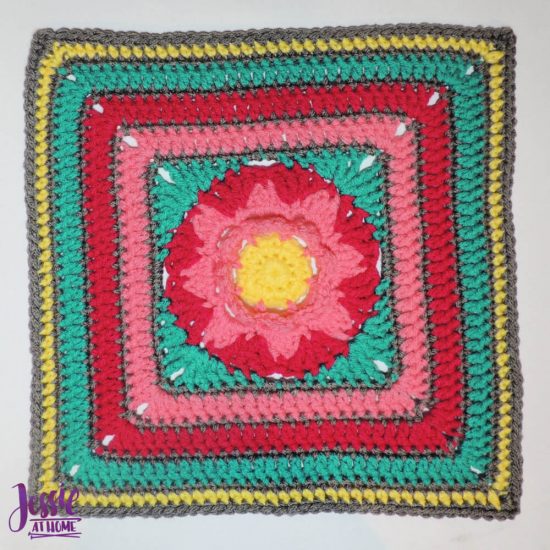
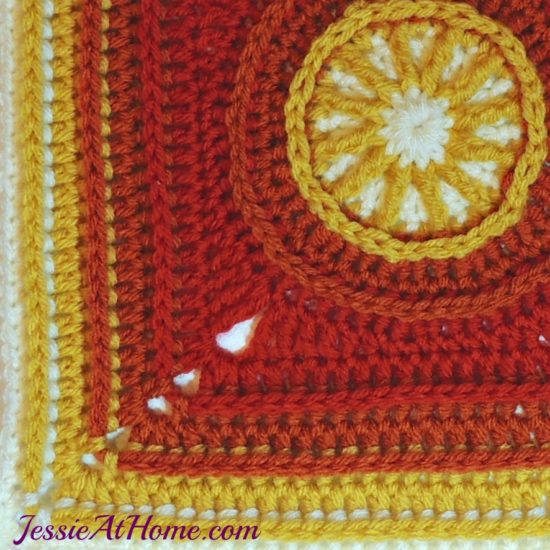
Get your crochet hook and get ready to have some fun with the That 70s Square! This free crochet pattern is all about making a beautiful flower granny square that is sure to brighten up any project. Follow the simple, step-by-step instructions to get this afghan block on your hook now. There’s plenty of photos and video tutorials to help you create this delightful granny square.
Table of contents

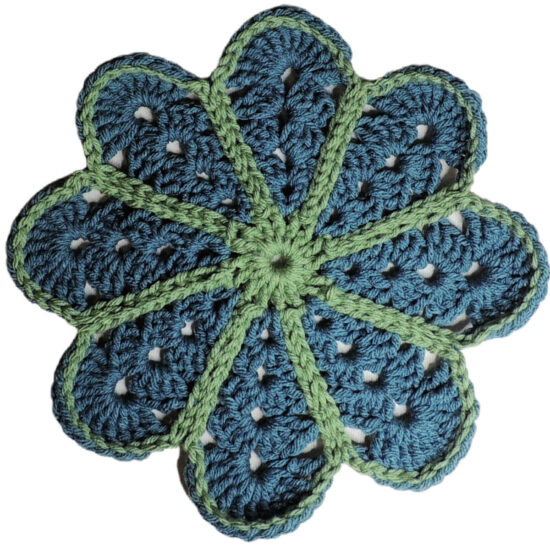
That 70s Square was inspired by my That 70s Flower crochet applique. I’m very pleased with the texture and beauty of the finished square. Enjoy this crochet flower granny square pattern, I enjoyed designing it!
I’m proud to let you know that this is the first square in the 2023 Moogly CAL. I know some of you have a stack of crochet blankets about a mile high. One more couldn’t hurt, right? Besides, this crochet granny square with a flower center is too full of crochet beauty to pass up! Look at the way those flower petals are outlined. That’s my favorite part!
I’ve made two video tutorials to help you out. There are some great tips in them as well! You can find them at the end of the pattern.
That 70s Square
Crochet Pattern
Intermediate Skill Level
Designed by Jessie Rayot
Supplies & Stats
Size
12” Square
Yarn
Caron One Pound: (100% Acrylic), Size 4 – Medium/Worsted/Aran, 812 yds / 454 g, (1.79 yds/g)
155 yds / 85 g total used for one block
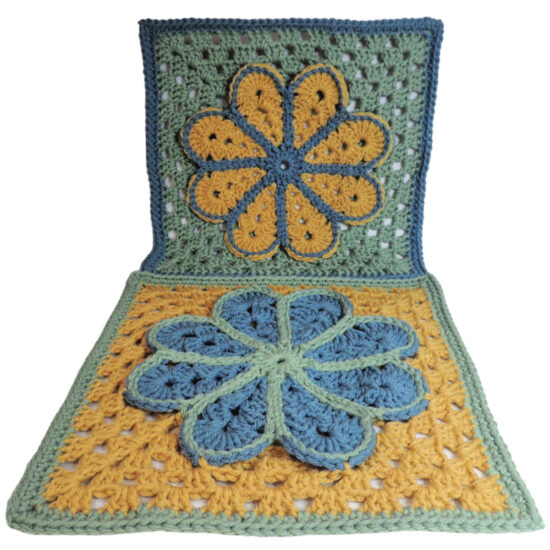
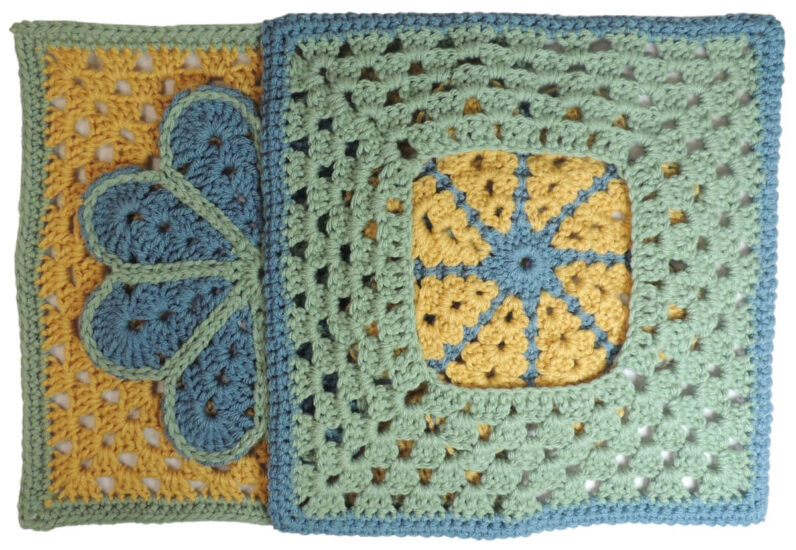
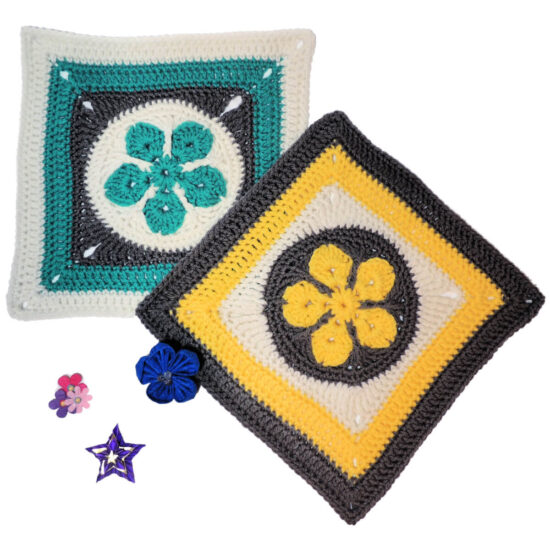
Samples made with: 10654 Dijon, 19655 Succulent and 19639 Canal
Crochet Hook
US J/10, 6.0 mm
Gauge
Learn about gauge HERE
14 sts x 7 rows = 4” [10 cm] in double crochet
Other Supplies
Stitches and Abbreviations
click on highlighted sts for tutorials
beg: beginning
ch: chain
dc: double crochet
dch2: double chain 2 (explained)
dch3: double chain 3 (explained)
rep: repeat
rnd: round
rs: right side
sc: single crochet
sl st: slip stitch
sp(s): space(s)
st(s): stitch(es)
tr: treble crochet
ws: wrong side
yo: yarn over
( ): work step in parentheses in indicated stitch
[ ]: work step in brackets number of times indicated
Get the Ad-Free Printable PDF at These Sites
- Jessie At Home – Buy directly from me, you can also get bonus printables!
- Ravelry
- Etsy
- LoveCrafts
Special Stitches
Double Chain 2 (dch2): Insert hook in st, yo, pull up a loop (2 loops on hook), yo, pull through both loops, there are 2 vertical loops coming off the loop on the hook, insert hook in the loop farthest from the hook, yo, pull up a loop (2 loops on hook), yo, pull through both loops.
Dch2 can be replaced with a ch 2 or 3.
Double Chain 3 (dch3): Insert hook in st, yo, pull up a loop (2 loops on hook), yo, pull through both loops, [there are 2 vertical loops coming off the loop on the hook, insert hook in the loop farthest from the hook, yo, pull up a loop (2 loops on hook), yo, pull through both loops] 2 times.
Dch3 can be replaced with a ch 3 or 4.
Standing Double Crochet (sdc): Place slip knot on hook, hold in place with index finger so it doesn’t rotate, yo, insert hook in designated st, yo, pull up a loop (3 loops on hook), yo, pull through 2 loop (2 loops on hook), yo, pull through all loops.
Standing Single Crochet (ssc): Place slip knot on hook, hold in place with index finger so it doesn’t rotate, insert hook in designated st, yo, pull up a loop (2 loops on hook), yo, pull through all loops.
Pattern Notes
- Read through all instructions before beginning.
- The stitch count is at the end of each rnd/row after the period, usually only if the count has changed from the previous rnd/row. {count here}
- Chs and sl sts are not included in stitch counts unless specified.
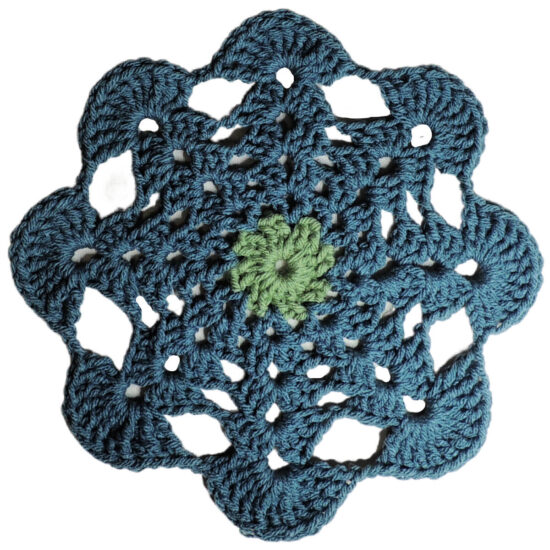
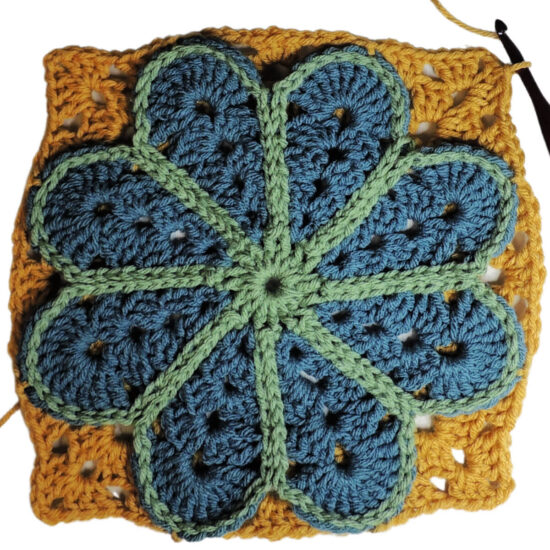
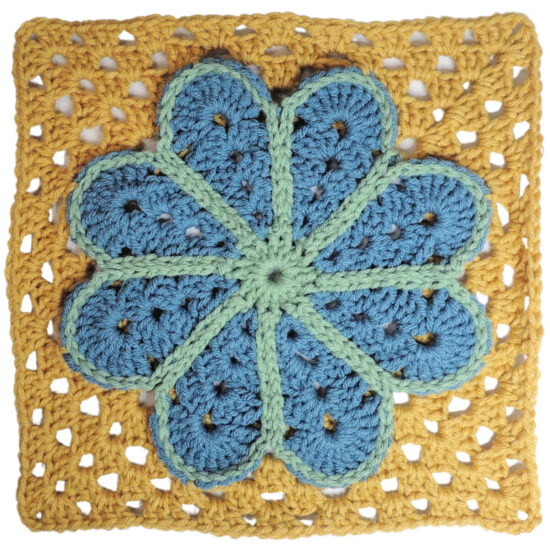
Flower Granny Square Pattern
Inner Flower
Rnd 1: With Color A ch 4, sl st to form a ring (or use a magic ring), dch2 in ring, ch 1, [dc, ch 1] 15 times in ring, sl st in top of beg dch2. (16 dc)
Fasten off then weave in ends.
Rnd 2: With Color B sdc in a ch-1 sp, ch 2, dc in same space, [ch 1, skip 1 ch-1 sp, (dc, ch 2, dc) in next ch-1 sp] 7 times, ch 1, sl st in top of beg dc. (16 dc)
Rnd 3: Sl st in ch-2 sp, (dch2, ch 2, 2 dc) in same space, [ch 1, skip 1 ch-1 sp, (2 dc, ch 2, 2 dc) in next ch-2 sp] 7 times, ch 1, dc in next ch-1 sp, sl st in top of beg dch2. (8 shells of 4 dc)
Rnd 4: Sl st in ch-2 sp, (dch2, ch 2, 3 dc) in same space, [ch 1, skip 1 ch-1 sp, (3 dc, ch 2, 3 dc) in next ch-2 sp] 7 times, ch 1, 2 dc in next ch-1 sp, sl st in top of beg dch2. (8 shells of 6 dc)
Rnd 5: Sl st in ch-2 sp, (dch2, ch 2, 4 dc) in same space, [ch 1, skip 1 ch-1 sp, (4 dc, ch 2, 4 dc) in next ch-2 sp] 7 times, ch 1, 3 dc in next ch-1 sp, sl st in top of beg dch2. (8 shells of 8 dc)
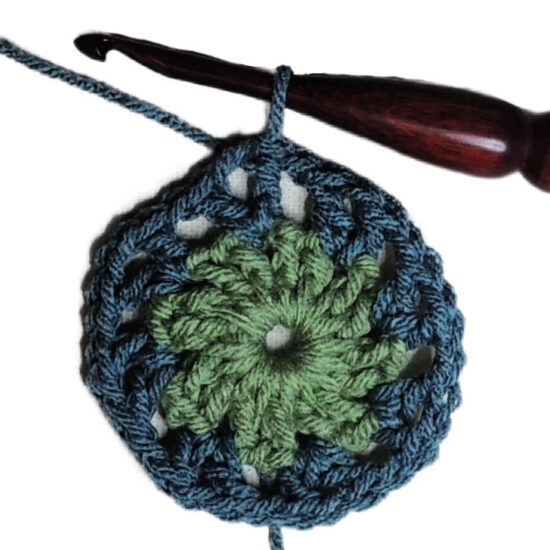
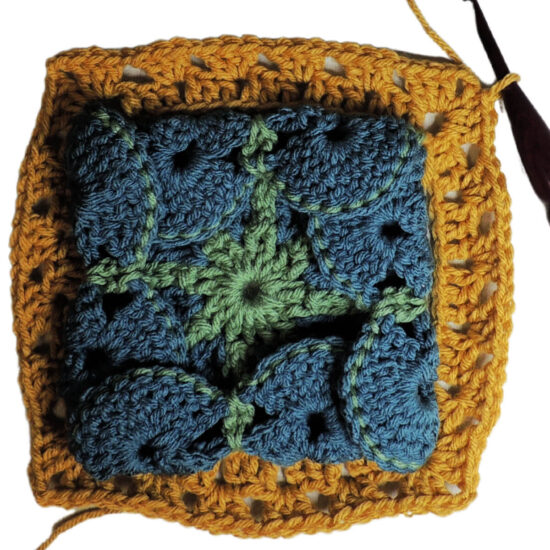
Rnd 6: Sl st in ch-2 sp, (dch3, 10 tr in same space), [ch 2, skip 1 ch-1 sp, 11 tr in next ch-2 sp] 7 times, ch 2, sl st in top of beg dch3. (8 petals of 11 tr)
Fasten off then weave in ends.
Rnd 7: With Color A, sl st in first tr of any set of 11 tr, sl st in each of next 10 tr, ch 1, *begin working towards center, sl st in ch-2 sp, [ch 1, sl st in ch sp below] 5 times, begin working toward outer edge, [ch 1, sl st in ch sp above] 5 times, ch 1, sl st in each of next 11 tr, ch 1; rep from * 6 more times, begin working towards center, sl st in ch-2 sp, [ch 1, sl st in ch sp below] 5 times, begin working toward outer edge, [ch 1, sl st in ch sp above] 5 times, ch 1, sl st to beg of round.
Fasten off and weave in ends.
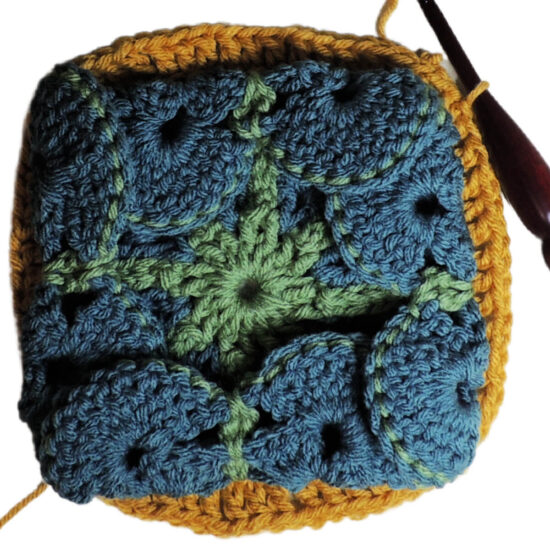
Outer Square
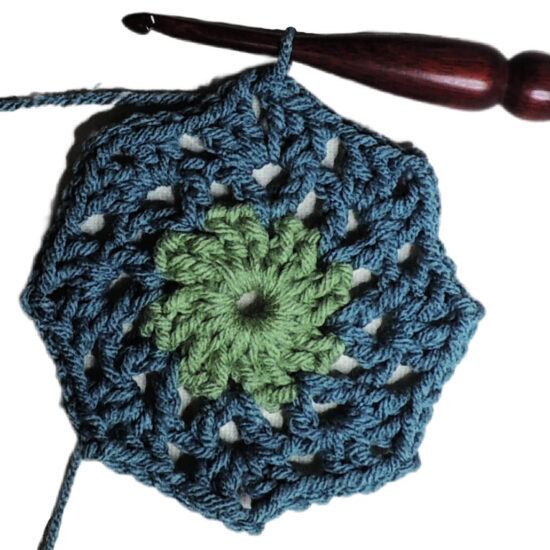
Rnd 1 (WS): Entire round is worked in back of Flower, join Color C with a sl st to the back loops of the Color A sl sts around a ch-2 space of Rnd 7 of Flower, [ch 15, skip 1 ch-2 sp of Rnd 7, sl st in back loops of Color A sl sts around next ch-2 sp of Rnd 7] 4 times. {4 sets of ch-15}
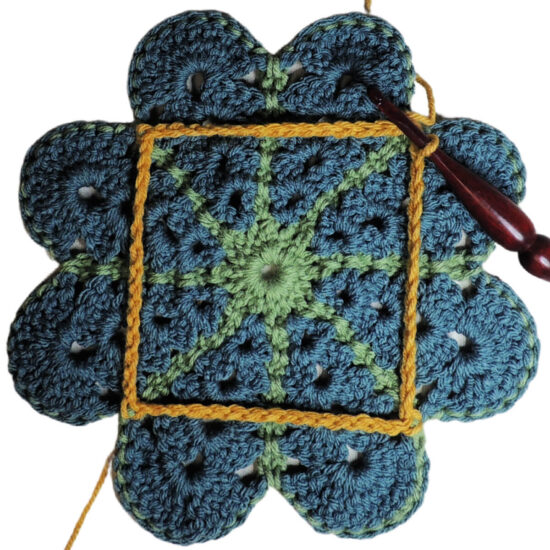
Rnd 2 (RS): Sl st in next ch-15 sp, turn, dch2 in same ch-15 sp, ch 2, *[3 dc, ch 1] 4 times in next ch-15 sp, 3 dc in same ch-15 sp, ch 2; repeat from * 2 more times, [3 dc, ch 1] 4 times in next ch-15 sp, 2 dc in same ch-15 sp, sl st in top of beg dch2. {5 sets of 3 dc on each side}
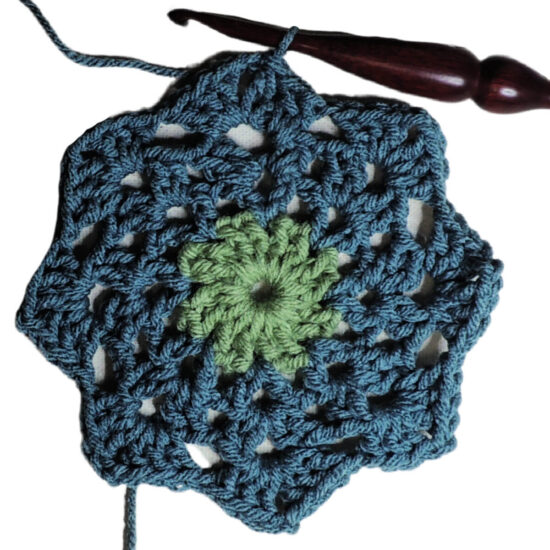
Rnd 3: Sl st in ch-2 corner sp, (dch2, ch 2, 3 dc) in same ch-2 corner sp, *[ch 1, 3 dc in next ch-1 sp] 4 times, ch 1, (3 dc, ch 2, 3 dc) in next ch-2 corner sp; repeat from * 2 more times, [ch 1, 3 dc in next ch-1 sp] 4 times, ch 1, 2 dc in next ch-2 corner sp, sl st in top of beg dch2. {6 sets of 3 dc on each side}
Rnd 4: Sl st in ch-2 corner sp, (dch2, ch 2, 3 dc) in same ch-2 corner sp, *ch 1, 3 dc in next ch-1 sp, ch 1, sl st in middle tr of next set of 11 tr from Rnd 6 of Flower, [3 dc in next ch-1 sp, ch 1] 2 times, 3 dc in next ch-1 sp, sl st in middle tr of next set of 11 tr from Rnd 6 of Flower, ch 1, 3 dc in next ch-1 sp, ch 1, (3 dc, ch 2, 3 dc) in next ch-2 corner sp; repeat from * 2 more times, ch 1, 3 dc in next ch-1 sp, ch 1, sl st in middle tr of next set of 11 tr from Rnd 6 of Flower, [3 dc in next ch-1 sp, ch 1] 2 times, 3 dc in next ch-1 sp, sl st in middle tr of next set of 11 tr from Rnd 6 of Flower, ch 1, 3 dc in next ch-1 sp, ch 1, 2 dc in next ch-2 corner sp, sl st in top of beg dch2. {7 sets of 3 dc on each side}
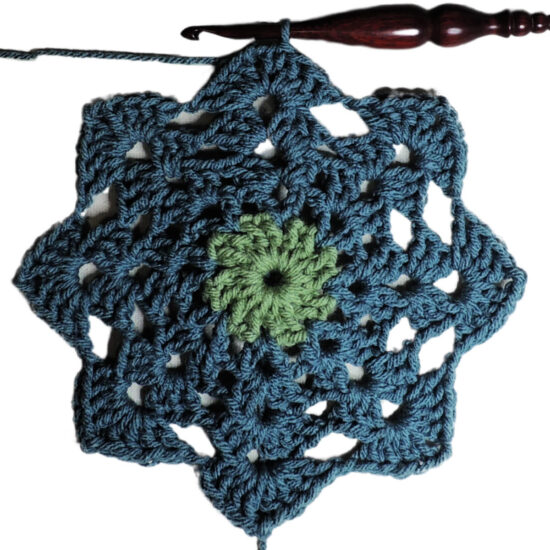
Rnds 5-6: Sl st in ch-2 corner sp, (dch2, ch 2, 3 dc) in same ch-2 corner sp, *[ch 1, 3 dc in next ch-1 sp] to next ch-2 sp, ch 1, (3 dc, ch 2, 3 dc) in next ch-2 corner sp; repeat from * 2 more times, [ch 1, 3 dc in next ch-1 sp] to next ch-2 sp, ch 1, 2 dc in next ch-2 corner sp, sl st in top of beg dch2. {9 sets of 3 dc on each side after Rnd 6}
Fasten off and weave in ends.
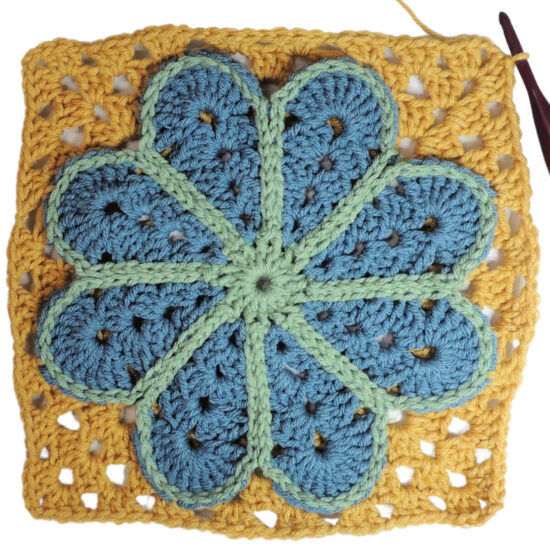
Rnd 7: With Color A, ssc in any ch-2 corner, ch 2, sc in same sp, *sc in each of next 3 sts, [sc in next ch-1 sp, sc in each of next 3 sts] to next ch-2 sp, (sc, ch 2, sc) in ch-2 sp; repeat from * 2 more times, sc in each of next 3 sts, [sc in next ch-1 sp, sc in each of next 3 sts] to next ch-2 sp, sc in ch-2 sp, sl st in beg ch-3. – {37 sc on each side}
Rnd 8: Sl st in ch-2 corner sp, ch 3, sc in same sp, [sc in each st across to next ch-2 sp, (sc, ch 2, sc) in ch-2 sp] 3 times, sc in each st across to next ch-2 sp, sc in ch-2 sp, sl st in beg ch-3. – {39 sc on each side}
Fasten off and weave in ends.
Finishing
- Make sure all ends are woven in.
- Block square.
Happy Stitching!
Flower Granny Square Video Tutorials
Inner Flower
You can also find this video on YouTube HERE.
Outer Square
You can also find this video on YouTube HERE.
FAQs
Not at all!! If you’re making the Moogly afghan, the blocks are designed to be 12″. If your gauge give you a different size, the rest of the squares will most likely end up the same size as this one. You do you.
First, check your gauge.
After making Round 5, measure the block from side to side crossing over where the petals are attached to the square (it’s important to measure in the correct spot, you can see it on the video). Your square should be 10 inches. If it’s 9.5 inches or smaller, make round 6 twice. If your square is 10.5 inches or larger, skip round 6.
You can also repeat round 8 to make it larger.
2 options:
1 – tack it down on the back after you are done.
2 – Rnd 1 of the Outer Square option:
Rnd 1 (WS): Entire round is worked in back of Flower, join Color C with a sl st to the back loops of the Color A sl sts around a ch-2 space of Rnd 7 of Flower, [ch 7, sl st in back loops of Color A sl sts around next ch-2 sp of Rnd 5, ch 7, sl st in back loops of Color A sl sts around next ch-2 sp of Rnd 7] 4 times. {8 sets of ch-7}
Then on Rnd 2, work the sts that would go in the ch-5 sp evenly in the 2 ch-7 sps.
Did you enjoy what you found here at Jessie At Home? Then sign up for my newsletter and like my Facebook page, so you’ll get all the updates on new tutorials, other posts, sales, and coming events.
If you have any questions, want to share pictures of your work, or just want to chat with Jessie and other crafty individuals, than join one of our free Zoom Sit & Stitches. Find them on our Events Calendar.

© Copyright 2023 Jessie Rayot / Jessie At Home LLC All my videos, patterns, charts, photos and posts are my own work, so you may not copy them in any way. If you want to share this information with someone, then share the link to this post.


What about the back? And the gaps?
I’m not sure what the back question is. If the 15 chain being loos bothers you, you can tack it down at the end when you weave in ends, or you can catch the back loops around Rnd 5 with the 8th chain to tack it down in the middle.
My coworker/boss loves daisies and I’m thinking I could make her this afghan for her birthday in March pretty quickly… she also loves pink so I’m imagining bright pink squares with white/yellow daisies all over the top… she’s a lifelong ‘hippie’ and admits to this freely… this will be perfect for her!!!
Thank you for the lovely pattern!!!
Rose
Do you have any specific tips or methods for how to block these squares to make sure they’re 12″? 🙂
If you need to add or subtract some of the boarder rounds of just sc, you can. For blocking I pinned mine out to a 12″ square, then steamed it. You can also pin it out to a 12″ square and spray it with hot water, or even wet block it. I happen to prefer steam.
Here’s an affiliate link for the steamer I have and love: https://amzn.to/3U07dmm
If I wanted to reduce this to 6” square how could I do that.
Use a smaller yarn and hook. Any other answer requires a new pattern.